Absence of Change
10 minute read
Scenario
In this tutorial, we will explore the use case where the requirement is to monitor a fleet of freezers and trigger an alert if one of them remains above 32 degrees continuously for more than 15 minutes, an alert must not fire if the freezer rises above 32 but drops back below that threshold in less than 15 minutes. There is no explicit event or mechanism that confirms the fact that the temperature has been above the threshold continuously for 15 minutes. For demonstration purposes, we will use a duration of 10 seconds instead of 15 minutes. The source data is a PostgreSQL table that stores the latest reported temperature of each freezer.
Tutorial Modes
You can follow along the steps below in a Github codespace, a VSCode Dev Container or your own Kubernetes environment.
The easiest way to follow along with this tutorial is to launch a Github Codespace using the link below. This will allow you to run the example application within your browser without setting up anything on your own machines.
![]()
This will open a page with some configuration options. Make sure that the Branch selected is main and set the Dev Container configuration to Absence of Change with Drasi.
To follow along with a Dev Container, you will need to install:
- Visual Studio Code
- Visual Studio Code Dev Containers extension
- docker
Next, clone the learning repo from Github, and open the repo in VS Code. Make sure that Docker daemon (or Docker Desktop) is running.
Once the solution is open in VS Code, follow these steps:
- Press Cmd + Shift + P (on MacOS) or Ctrl + Shift + P (Windows or Linux) to launch the command palette.
- Select
Dev Containers: Rebuild and Reopen in Container. - Select the
Absence of Change with Drasioption to launch this tutorial.
Recommended Docker Resources
For optimal performance with the Drasi Dev Container, we recommend configuring Docker with the following minimum resources:
- CPU: 3 cores or more
- Memory: 4 GB or more
- Swap: 1 GB or more
- Disk: 50 GB available space
To adjust these settings in Docker Desktop:
- Open Docker Desktop
- Go to Settings (gear icon)
- Navigate to “Resources” → “Advanced”
- Adjust the sliders to meet or exceed the recommended values
- Click “Apply & Restart”
You need to have your own Kubernetes cluster setup. You can use any Kubernetes setup. For a local testing setup, you can choose one of alternatives like Kind, Minikube or k3d.
Make sure that kubectl on your system points to your Kubernetes cluster.
Required tools:
- Drasi CLI
- PostgreSQL CLI tool (
psql)
Optional tools (for VSCode Extension path):
Deploy PostgreSQL to your cluster:
kubectl apply -f ./postgres.yaml
kubectl wait --for=condition=ready pod -l app=postgres --timeout=60s
Open a port forward to access the PostgreSQL instance:
kubectl port-forward services/postgres 5432:5432
PostgreSQL Table
A PostgreSQL table named Freezer has been pre-loaded with that following data:
| id | temp |
|---|---|
| 1 | 20 |
| 2 | 28 |
| 3 | 35 |
| 4 | 20 |
| 5 | 40 |
You can view this data by connecting to the PostgreSQL instance.
psql
Then run the following SQL script:
select * from "Freezer";
Drasi VSCode Extension
We also have a VSCode extension for Drasi, which can make it easy to debug and deploy Drasi components. Although this is not required, you can use this during our tutorial if you want a terminal-free experience.
Your codespace already has the Drasi extension installed.
Your dev container already has the Drasi extension installed.
You can install the VSCode Extension by following the instructions here.
Note: If you are using VSCode and installing the extension, it is recommended to open the folder learning/tutorial/absence-of-change in VSCode.
This is because the extension automatically lists all the Drasi YAMLs found in your workspace and the screenshots in the rest of this tutorial assume the set of YAMLs within the path mentioned earlier. If you have learning or other a different path opened in VSCode, you might see a different set of source, query and reaction YAMLs.
Deploy the source
Next we need to connect Drasi to the PostgreSQL database. We have the following YAML in file source.yaml:
apiVersion: v1
kind: Source
name: my-source
spec:
  kind: PostgreSQL
  properties:
    host: postgres.default.svc.cluster.local
    user: test
    port: 5432
    ssl: false
    password: test
    database: tutorial
    tables:
      - public.Freezer
This YAML tells Drasi how to connect to the PostgreSQL database.
Find the source in the Workspace inside Drasi VSCode Extension as shown here, and click “Apply”:
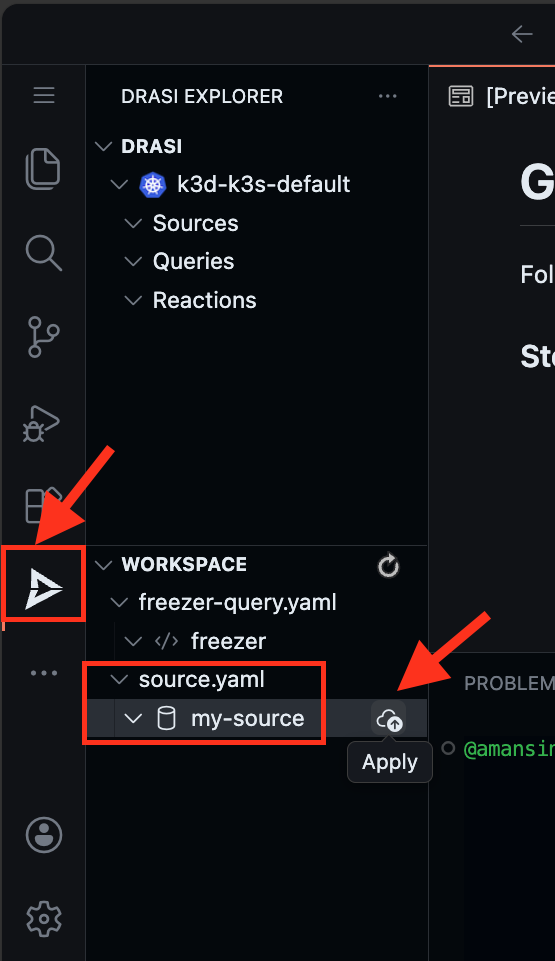
You will get a pop-up on the bottom right corner of your screen. Confirm if you want to deploy the source.
You will see the source with a Red icon - which means we need to wait for few seconds for the source to come online.
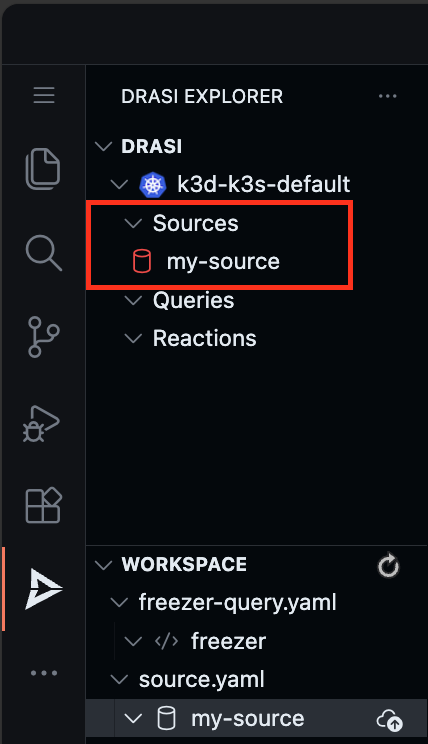
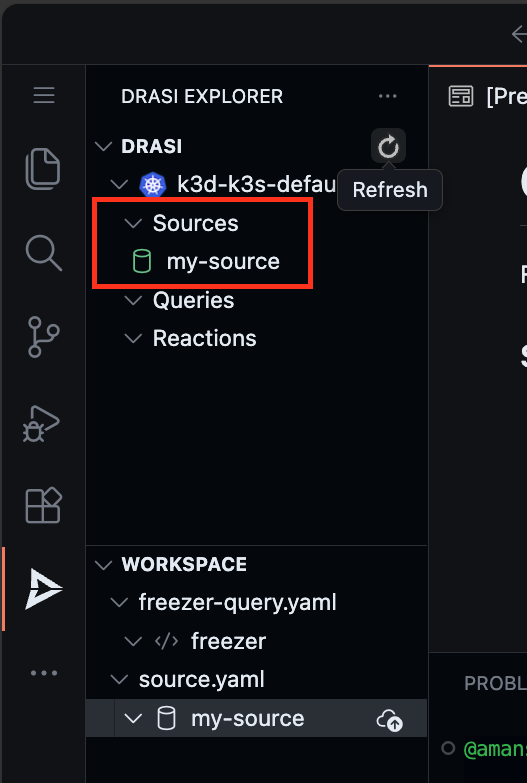
The source will show up with a Green icon when it is ready for use. Try the refresh button if it does not become ready within a couple minutes.
Use the following commands to apply the source, and wait for it to come online:
drasi apply -f source.yaml
Wait for the source to be ready (this may take a few minutes):
drasi wait -f source.yaml -t 120
Verify the source is online:
drasi list source
The source should be listed with AVAILABLE set to true:
     ID     | AVAILABLE | INGRESS URL | MESSAGES
------------+-----------+-------------+-----------
  my-source | true      |             |
Continuous Query
Continuous Queries are the mechanism by which you tell Drasi what changes to detect in source systems as well as the data you want distributed when changes are detected. You can read more about them here.
To express that a condition must be continuously true for a specified duration, we will use the trueFor function. The trueFor function takes an expression that must evaluate to true for the duration specified, if this expression holds true for the entire length of the duration specified, only then will a notification be emitted that a new item has been added to the result set.
MATCH
  (f:Freezer)
WHERE drasi.trueFor(f.temp > 32, duration( { seconds: 10 } ))
RETURN
  f.id AS id,
  f.temp AS temp
The full YAML file for the query is in freezer-query.yaml:
apiVersion: v1
kind: ContinuousQuery
name: freezer
spec:
  mode: query
  sources:
    subscriptions:
      - id: my-source
  query: >
    MATCH
      (f:Freezer)
    WHERE drasi.trueFor(f.temp > 32, duration( { seconds: 10 } ))
    RETURN
      f.id AS id,
      f.temp AS temp
Watch Query Results
To observe the live result set of your continuous query, you can use either the VSCode Extension debug feature or the Drasi CLI watch command.
The VS Code extension allows you to debug queries and see their live result set. Open freezer-query.yaml in the editor, and click the Debug action.

This will open a window that will render a table with the live result set of the query.

Keep this debug window open - you will use it to observe changes in the next section.
Deploy the query and wait for it to be ready:
drasi apply -f freezer-query.yaml
Wait for the query to be ready (this may take a few minutes):
drasi wait -f freezer-query.yaml -t 120
Verify the query is running:
drasi list query
The STATUS should be Running:
    ID    | CONTAINER | ERRORMESSAGE |              HOSTNAME               | STATUS
----------+-----------+--------------+-------------------------------------+----------
  freezer | default   |              | default-query-host-xxxx-xxxx        | Running
The drasi watch command allows you to continuously monitor the result set of a query in real-time. This is the CLI equivalent of the VSCode Extension’s debug feature.
Open a new terminal and run the following command:
drasi watch freezer
Note: Column widths adjust to your terminal size. Use arrow keys to scroll if needed. Press
qto exit.
Important: Keep this terminal running with drasi watch freezer active. You will use it to observe changes in the next section while you run SQL commands in a separate terminal.
This opens an interactive terminal UI showing the live result set. Initially, you should see freezers 3 and 5 since they have temperatures above 32 degrees and have been that way since the database was initialized:
┌─────────────────────────────────┐
│ id          temp                │
│─────────────────────────────────│
│ 3           35                  │
│ 5           40                  │
└─────────────────────────────────┘
Use Arrow keys to navigate, Page Up/Down, Home/End to scroll, and q to exit.
Simulate freezer updates
Next, we will simulate some temperature changes by updating the PostgreSQL rows.
Make sure you have the query results visible (either the VSCode debug window or drasi watch freezer running in a separate terminal as described in the previous section).
Connect to the PostgreSQL instance in another terminal:
psql
Now run the following tests while watching the query results update in real-time.
Test 1: Update freezer 1 to trigger delayed alert
Run the following SQL script:
UPDATE "Freezer" SET temp = 38 WHERE id = 1;
If you watch the result set, you will notice that freezer 1 only appears after 10 seconds have elapsed. This demonstrates the trueFor function - the condition must remain true continuously for the specified duration before the item enters the result set.
Test 2: Update an already-alerting freezer
Now update freezer 3 from 35 degrees to 42 degrees:
UPDATE "Freezer" SET temp = 42 WHERE id = 3;
You will see the update reflect immediately because the condition has already been true for more than 10 seconds. The freezer was already in the result set, and the update just changes its temperature value.
Test 3: Remove a freezer from alerts
Now update freezer 5 from 40 degrees to 20 degrees:
UPDATE "Freezer" SET temp = 20 WHERE id = 5;
You will see it removed from the result set immediately. Once the condition becomes false, the item is immediately removed - there is no delay.
Test 4: Brief temperature spike (no alert)
If we update freezer 4 from 20 degrees to 35 degrees, and back down to 20 degrees before 10 seconds elapse, then it will never enter the result set:
UPDATE "Freezer" SET temp = 35 WHERE id = 4;
Wait a few seconds (but less than 10), then:
UPDATE "Freezer" SET temp = 20 WHERE id = 4;
Freezer 4 should never appear in the result set because the condition was not true continuously for 10 seconds. This demonstrates how the trueFor function prevents false alarms from brief temperature spikes.
Reflection
Congratulations! You have successfully used Drasi to monitor freezers and trigger alerts based on the absence of change - specifically, when a condition remains true for a specified duration without interruption.
Key Takeaways
Temporal Conditions with trueFor
The trueFor function allows you to express conditions that must be continuously true for a specified duration. This is powerful for scenarios where:
- You want to avoid false alarms from brief spikes or glitches
- You need to detect sustained conditions (like prolonged high temperatures)
- You want to react to the absence of expected events (like a freezer not cooling down)
No Polling Required
Unlike traditional approaches that would require polling the database every few seconds and tracking timestamps, Drasi handles all the temporal logic internally. You simply express your intent declaratively in the query.
Real-time Reactiveness
As you observed:
- Items enter the result set only after the condition has been true for the specified duration
- Updates to items already in the result set are reflected immediately
- Items are removed from the result set immediately when the condition becomes false
Cleanup
Simply close the codespace window - No cleanup required. You may choose to delete your codespace to avoid additional billed usage.
Simply close your devcontainer and clean it up using the VS Code extension. Or, you can delete the docker container from Docker Desktop.
To clean up the tutorial resources, run the following commands:
drasi delete -f freezer-query.yaml
drasi delete -f source.yaml
kubectl delete -f postgres.yaml
Further reading
There are several more functions with similar functionality for different use cases that you can explore in the documentation.
Here are some additional resources:
- Learn more about Drasi sources here.
- Learn more about Continuous queries here.
- Learn more about Drasi Reactions here.
Feedback
Was this page helpful?
Glad to hear it! Please tell us what you found helpful.
Sorry to hear that. Please tell us how we can improve.