Getting Started
19 minute read
This step-by-step tutorial will help you get Drasi up and running quickly and show you how easy it is to create Sources, Continuous Queries, and Reactions.
After completing this tutorial, which should take around 30 minutes, you will have created a simple end-to-end Drasi-based change-driven solution, and you will have a fully functional Drasi environment suitable for further experimentation on your own. You will then be able to continue to explore the capabilities of the Drasi platform creating Sources, Continuous Queries, and Reactions.
Solution Overview
In this sample Drasi solution, the source of data (and change) will be a Message table in a PostgreSQL database, which holds the content of messages sent by people. The Message table contains these three fields:
| Field Name | Type | Description |
|---|---|---|
| MessageId | integer | A unique id for each message. |
| From | character varying(50) | The name of who the message is from. |
| Message | character varying(200) | The text of the message. |
You will create three Continuous Queries that observe the Message table to answer the following questions in real-time:
- Which people have sent the message “Hello World”?
- How many times has the same message been sent?
- Which people haven’t sent a message in the last 20 seconds?
Initially, the Message table will contain the following messages:
| MessageId | From | Message |
|---|---|---|
| 1 | Buzz Lightyear | To infinity and beyond! |
| 2 | Brian Kernighan | Hello World |
| 3 | Antoninus | I am Spartacus |
| 4 | David | I am Spartacus |
During the tutorial, you will modify the Message table, adding and removing messages, and observing the effect of those changes on your Continuous Query results using the Debug Reaction. The Debug Reaction subscribes to a set of Continuous Queries and provides a dynamic view of each query’s result set in a Web browser. It is common to use the Debug Reaction to test your Continuous Queries prior to setting up your actual Reactions.
Solution Architecture
When complete, the Hello World solution will have the component architecture shown in this diagram:
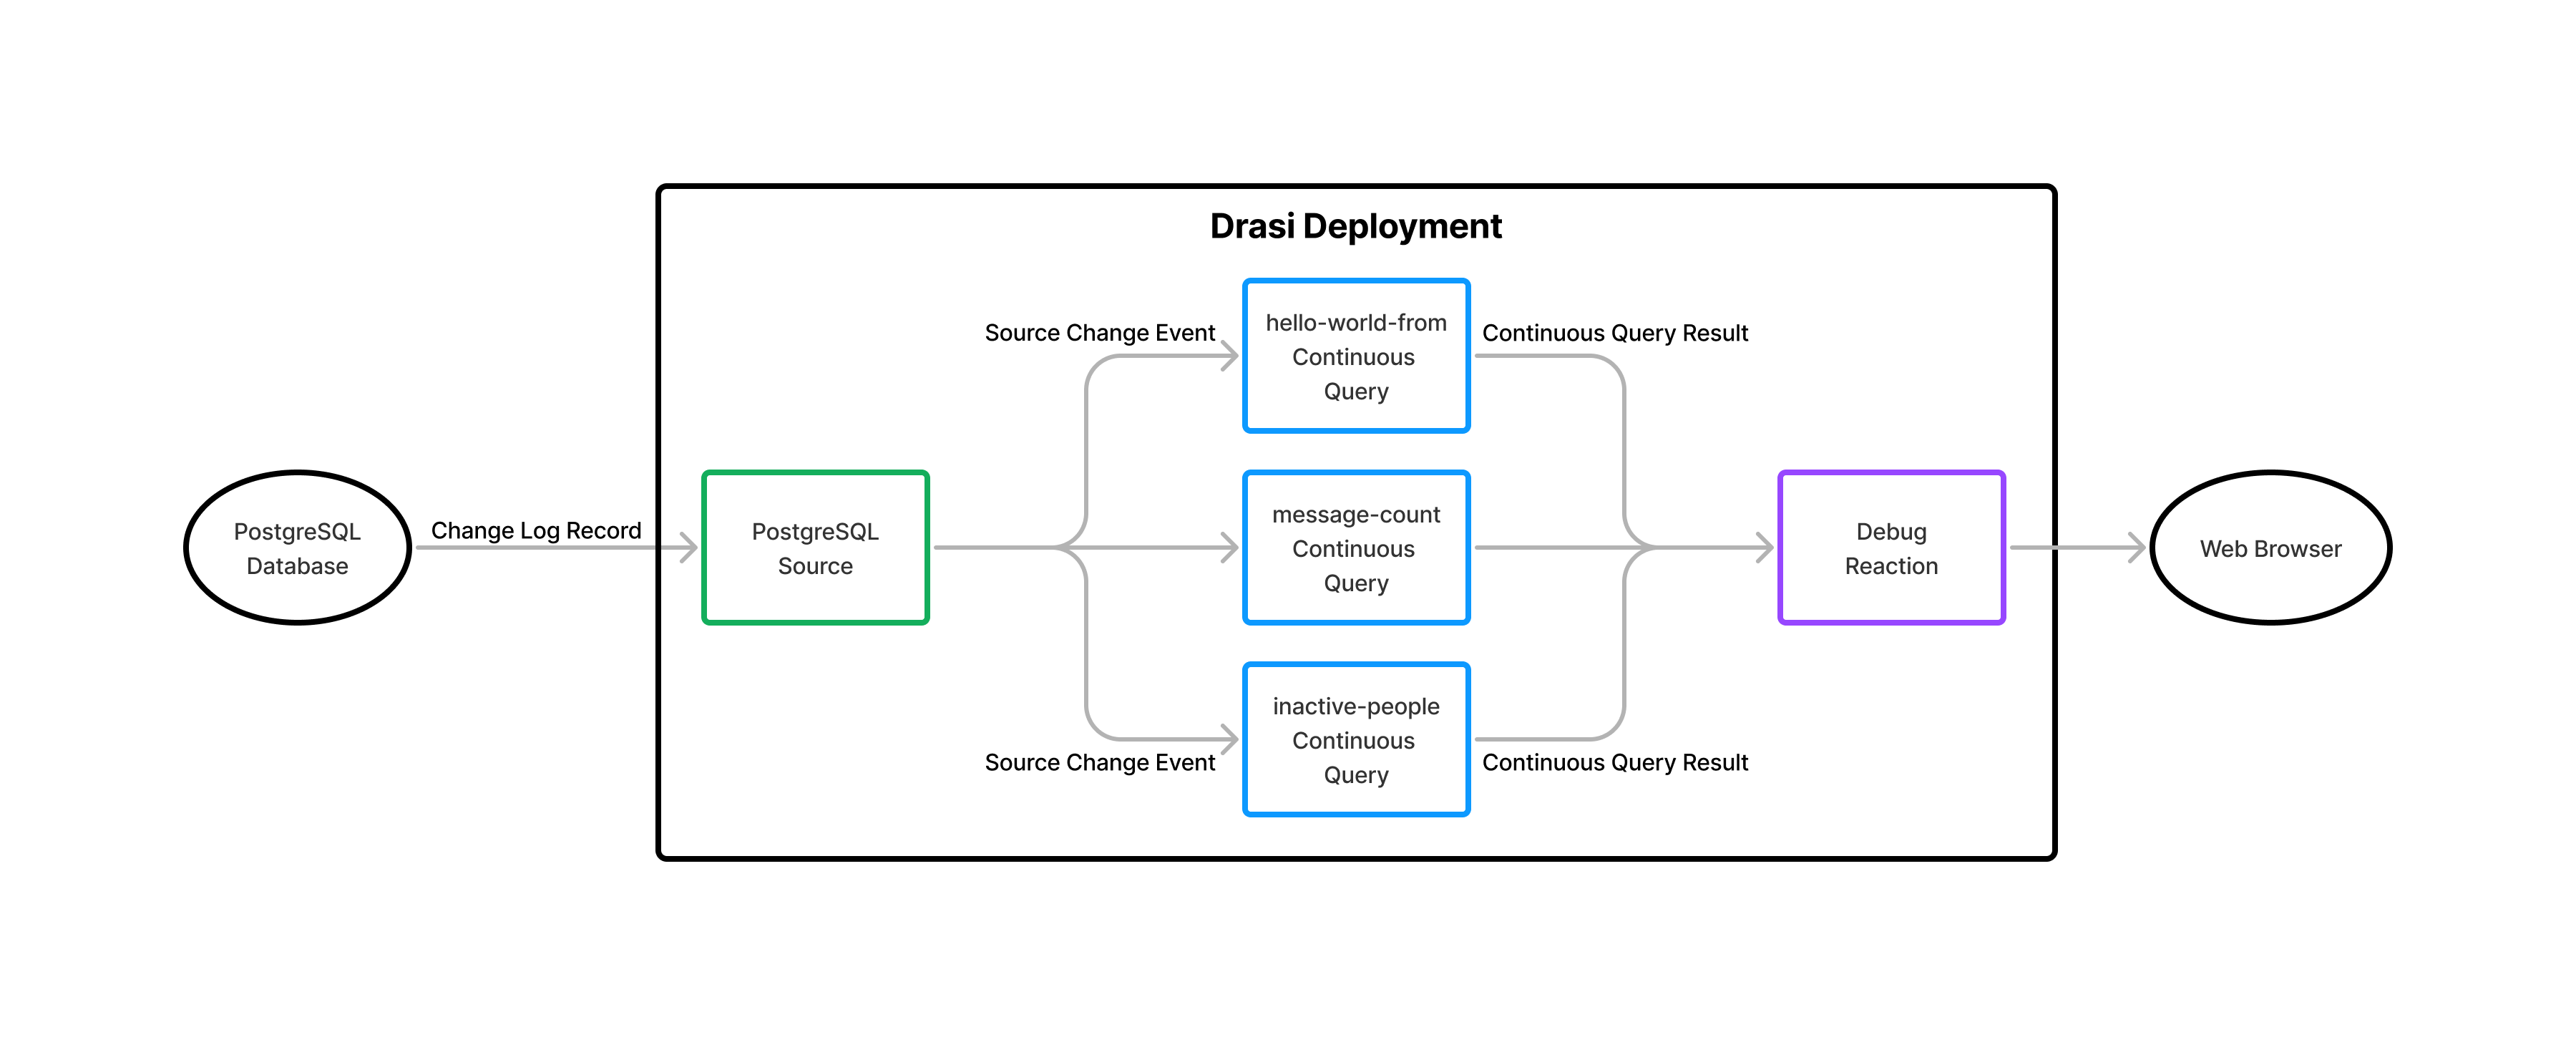
Although an intentionally simple example, the Hello World solution contains all the components of any Drasi-based solution, including:
- Drasi Sources that provide access to external data sources
- Continuous Queries that observe Sources and detect change
- Reactions that take action on the Continuous Query result set changes
To complete the tutorial, you will be guided through the following steps:
- Setup a Drasi Environment
- Create the PostgreSQL Source
- Create the Continuous Queries
- Create the Debug Reaction
- Test the Solution
Step 1 - Setup a Drasi Environment
To complete this tutorial, you need a Drasi environment and a PostgreSQL database. The quickest and easiest way is to use the GitHub Codespace created for the tutorial, which allows you to complete the tutorial without the need to setup or install anything. Alternatively, you can use the Visual Studio Code Dev Container created for the tutorial, which also avoids the need for you to setup infrastructure, but will run in VS Code on your machine. Finally, you can deploy a full Drasi environment on one of the supported platforms and setup a PostgreSQL database.
Complete one of the options described below before continuing to Step 2:
The Getting Started Tutorial codespace is hosted in the Drasi learning repo. Click this button to create a codespace:
![]()
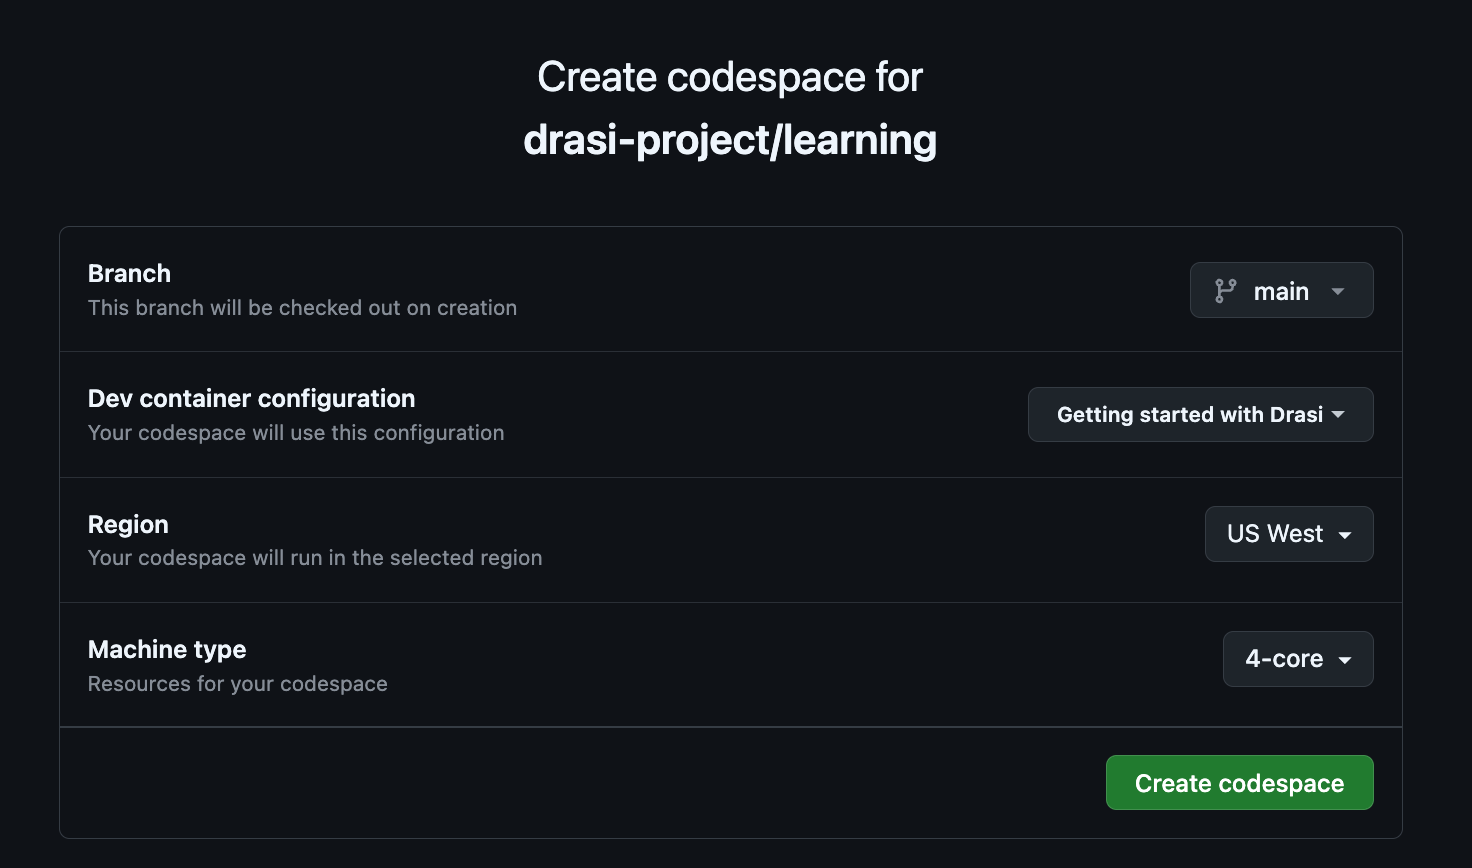
When you see the Create a new codespace screen, click the Create codespace button; there is no need to change any of the default configuration settings.
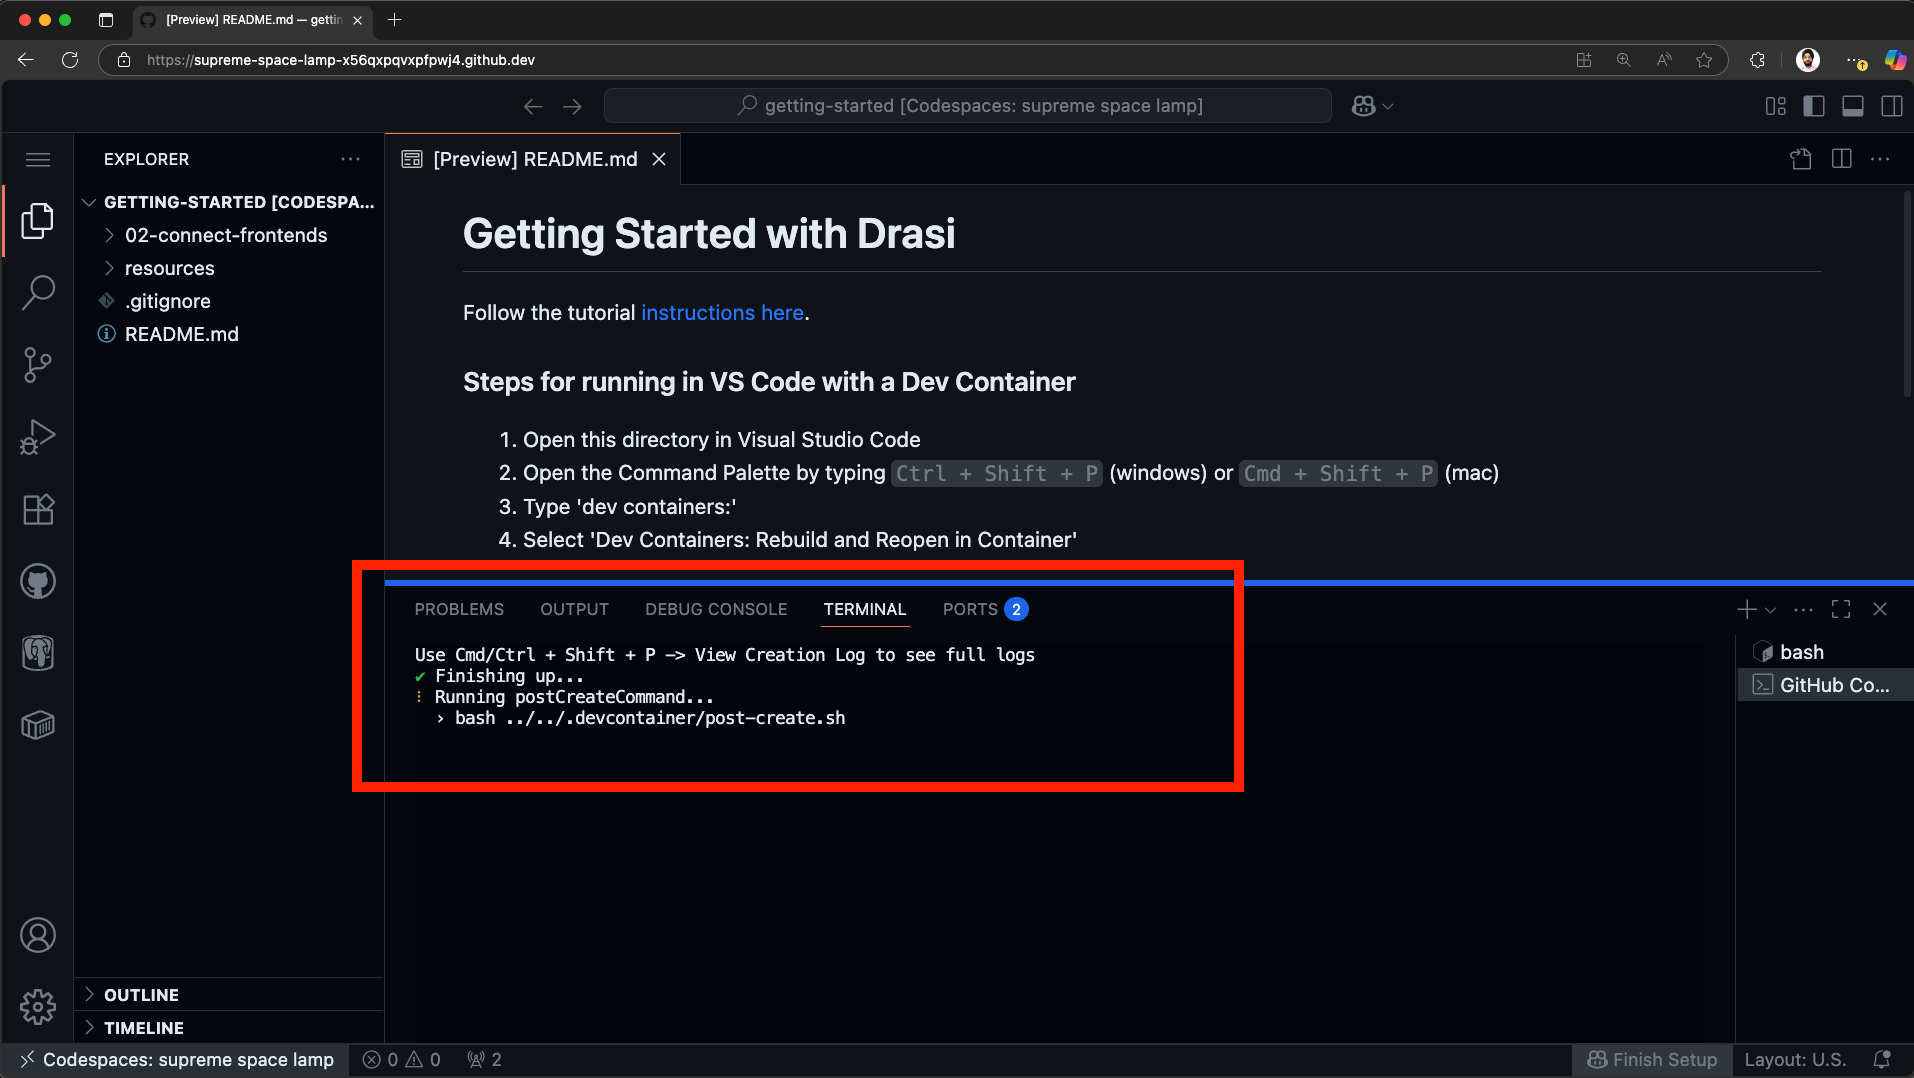
The codespace contains everything you need to complete this tutorial and will take a few minutes to complete the necessary startup and installation steps.
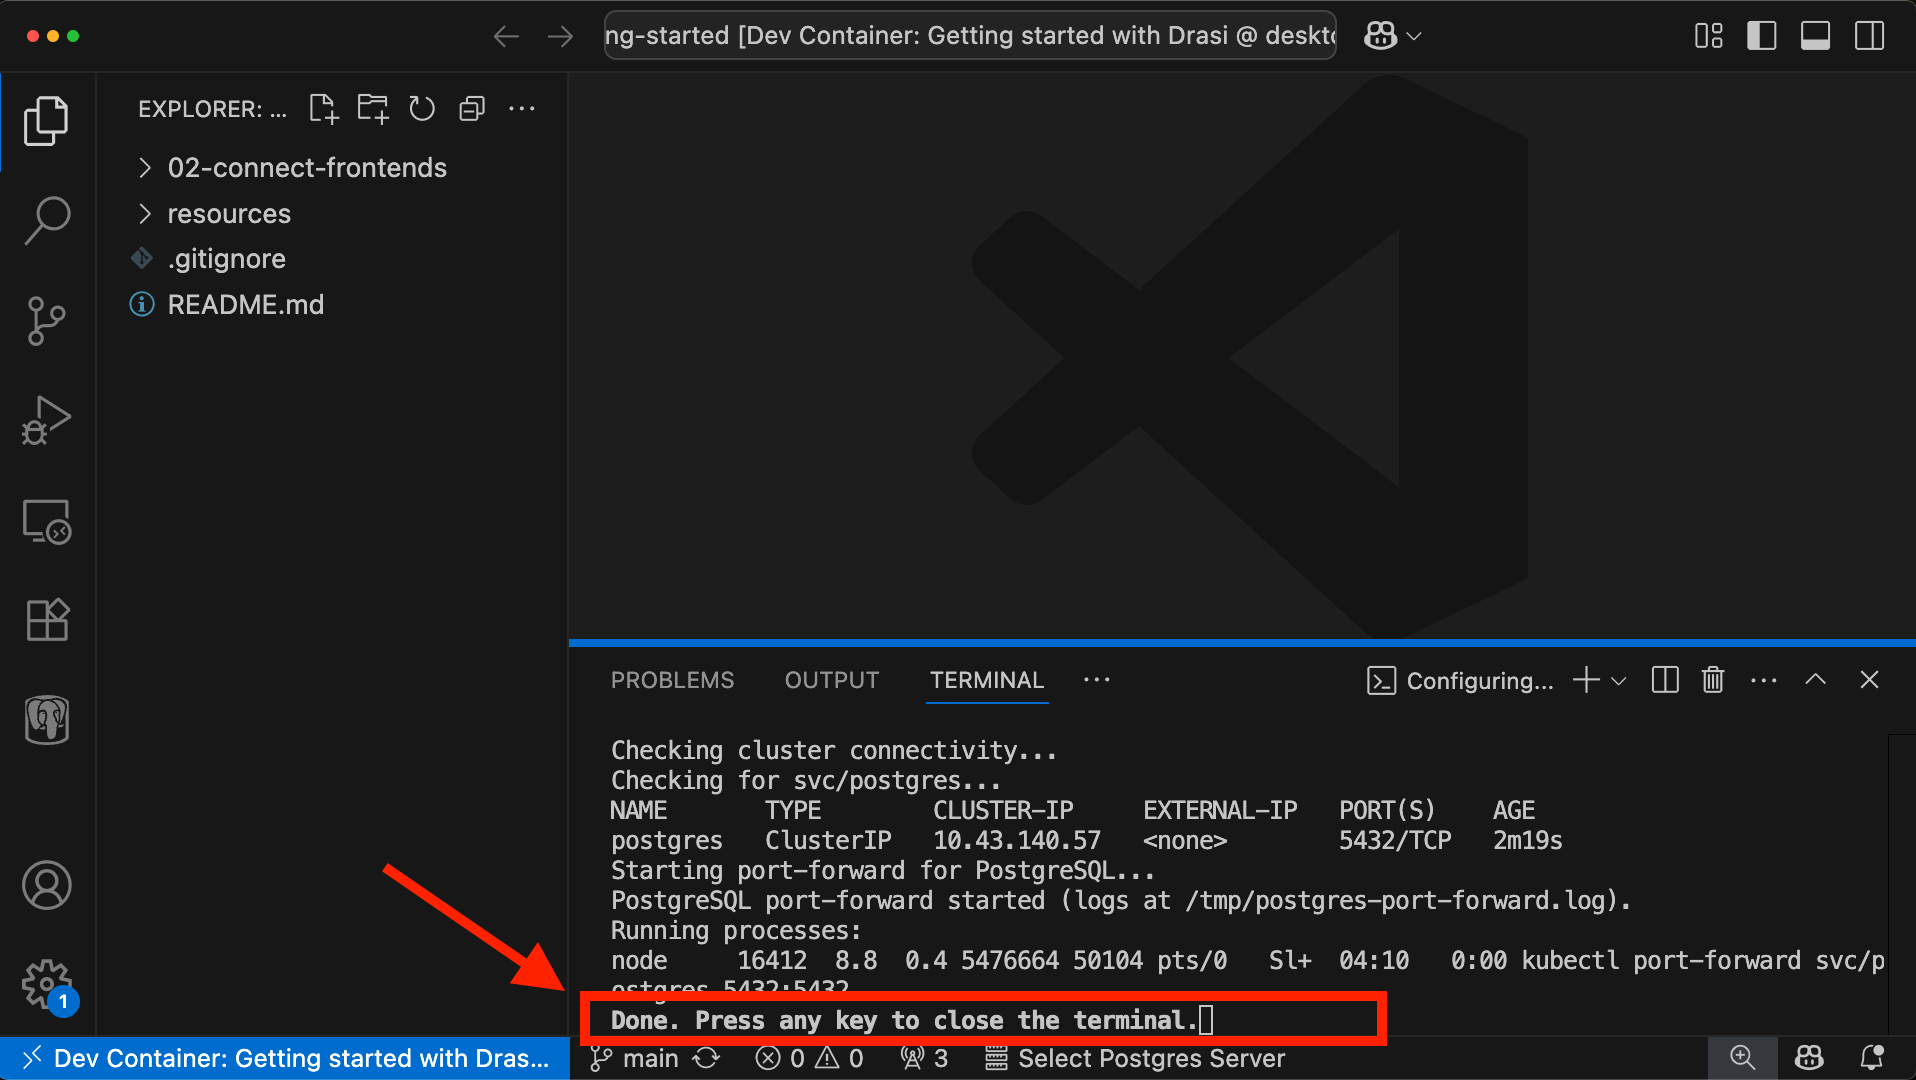
Wait for the setup scripts to complete like shown here:
Once the codespace creation is complete, it should look like this:
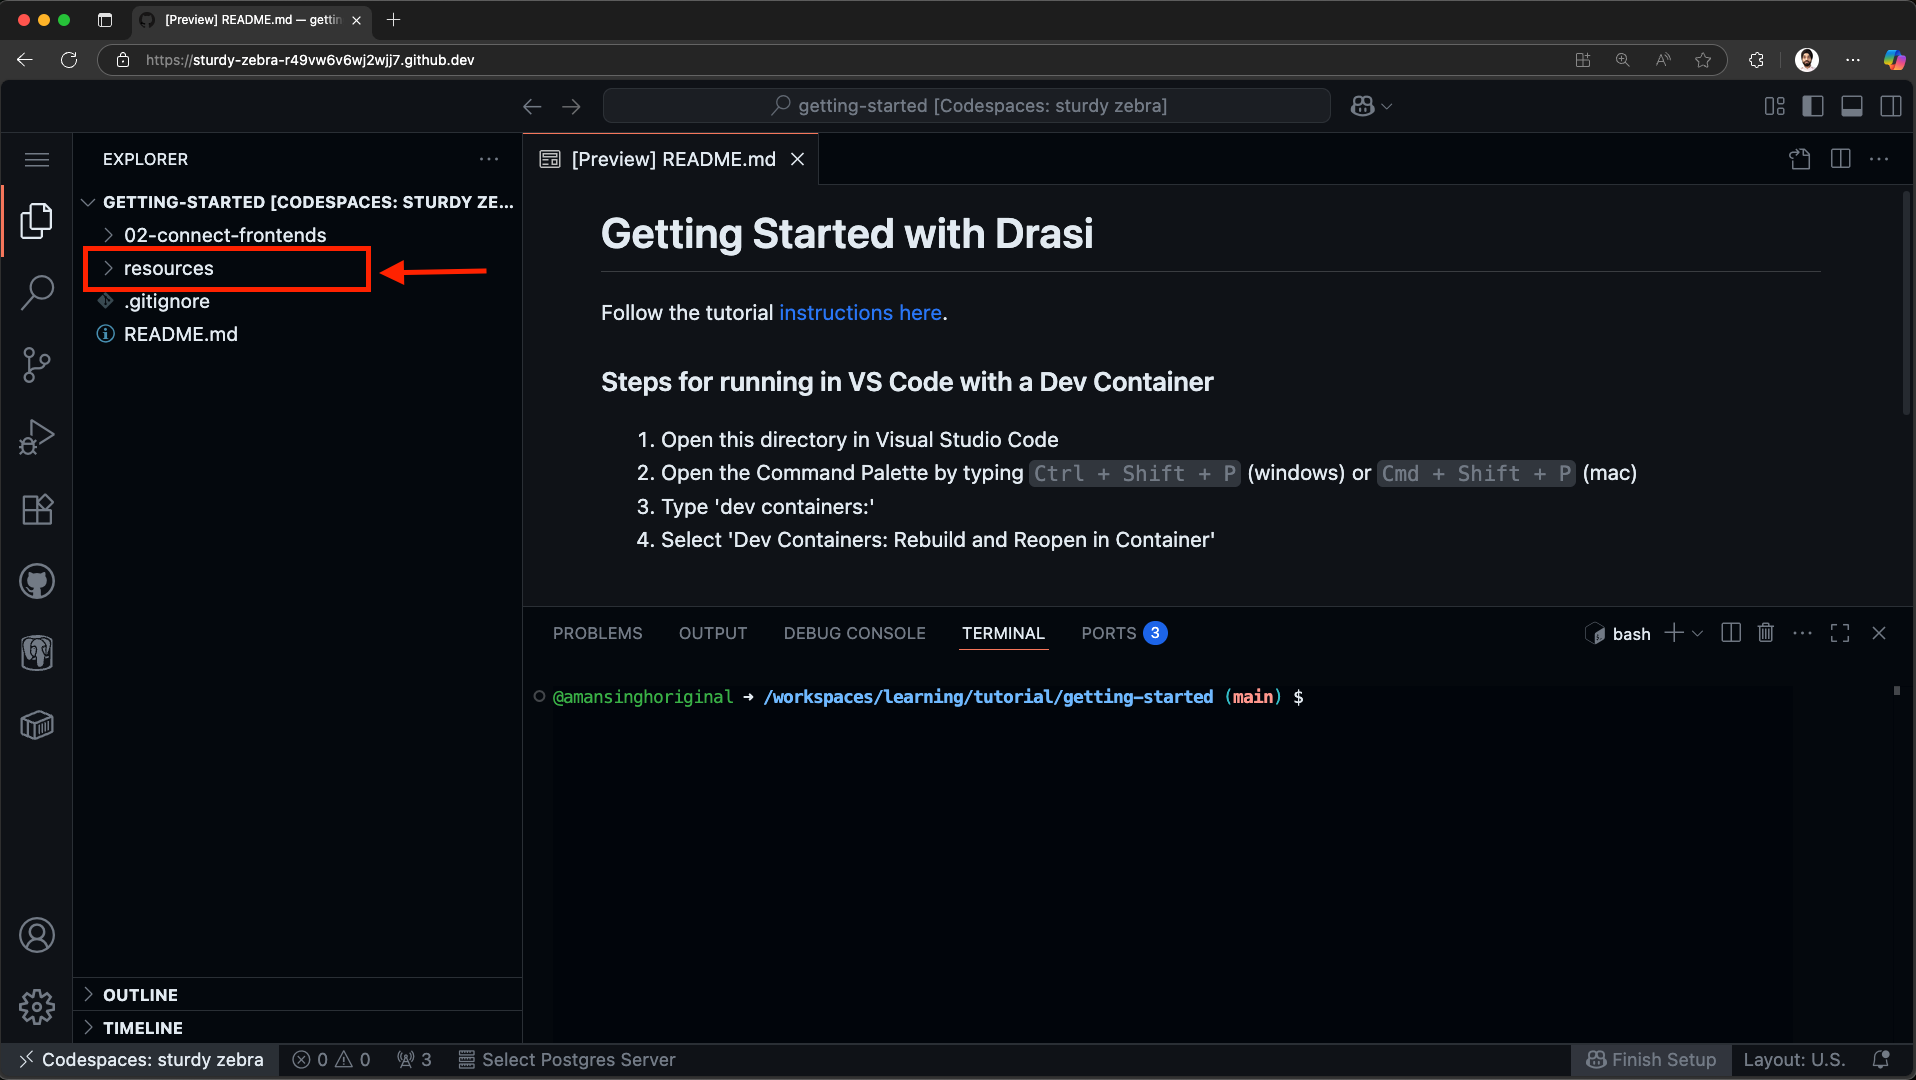
As shown in the screenshot above, in the VS Code Explorer panel you will see a folder called resources.
This folder contains files you will use later in the tutorial to create the Drasi Sources, Continuous Queries, and Reactions.
You can now proceed with the rest of the tutorial.
To use the Drasi Getting Started Dev Container, you will need to install:
- Visual Studio Code (or Insiders Edition)
- Visual Studio Code Dev Containers extension
- docker
Once you have these prerequisites installed:
- Download the Drasi Getting Started Tutorial ZIP file, which contains the files you will need during the tutorial.
- Unzip the Drasi Getting Started Tutorial ZIP file to a suitable location on your computer
- Run VS Code and open the
tutorial/getting-startedfolder from the Drasi Getting Started Tutorial files you just unzipped
Run the Dev Container as follows:
- Open the Command Palette using
Ctrl + Shift + P(Win/Linux) orCmd + Shift + P(Mac) - Type “dev containers:”
- Select “Dev Containers: Rebuild and Reopen in Container”
The Drasi Dev Container will take a few minutes to initialize depending on how many images it needs to download and the speed of your internet connection. The first time you run the Dev Container, it could take around 10 minutes because VS Code needs to download multiple images, install PostgreSQL, and install Drasi and its dependencies.
Once the setup process is complete, it should look like this:
As shown in the screenshot above, in the VS Code Explorer panel you will see a folders called resources.
This folder contains files you will use later in the tutorial to create the Drasi Sources, Continuous Queries, and Reactions.
You can now proceed with the rest of the tutorial.
Recommended Docker Resources
For optimal performance with the Drasi Dev Container, we recommend configuring Docker with the following minimum resources:
- CPU: 3 cores or more
- Memory: 4 GB or more
- Swap: 1 GB or more
- Disk: 50 GB available space
To adjust these settings in Docker Desktop:
- Open Docker Desktop
- Go to Settings (gear icon)
- Navigate to “Resources” → “Advanced”
- Adjust the sliders to meet or exceed the recommended values
- Click “Apply & Restart”
If the Dev Container startup fails, it is usually due to a problem with Docker resources. The following link contains instructions for cleaning out unused containers and images. If this doesn’t resolve your problem, you can contact the Drasi Team.
As an alternative to completing this tutorial using a GitHub Codespace or VS Code Dev Container you can install Drasi on one of the supported platforms Drasi Installation Guides. The complexity and time this will take depends on the platform you choose. After the installation completes, you will also need to configure the ingress controller in order to access the Debug Reaction later in the tutorial.
- AKS/EKS: Run the following command to install the Contour ingress controller:
drasi ingress init
- Kind: Run the following command to install the Contour ingress controller:
drasi ingress init --local-cluster
- k3d: Run the following command to install the Contour ingress controller:
drasi ingress init --local-cluster --ingress-annotation "projectcontour.io/websocket-routes=/"
Or, if you are using Traefik as the ingress controller, run:
drasi ingress init --use-existing --ingress-class-name traefik --ingress-ip-address 127.0.0.1
You will also need a PostgreSQL database where you can load the dataset used in the tutorial. The Getting Started Tutorial Dataset page describes a way to easily setup a PostgreSQL server on Kubernetes and to load the required data.
Finally, download the Drasi Getting Started Tutorial ZIP file, which contains the files you will need during the tutorial. Unzip the file to a suitable location on your computer and you can proceed with the rest of the tutorial.
Step 2 - Create the PostgreSQL Source
The following YAML is the content of the hello-world-source.yaml file, which you will use to create a Source that connects to your PostgreSQL database.
apiVersion: v1
kind: Source
name: hello-world
spec:
  kind: PostgreSQL
  properties:
    host: postgres.default.svc.cluster.local
    port: 5432
    user: test
    password: test
    database: hello-world
    ssl: false
    tables:
      - public.Message
This table describes the most important configuration settings in this Source definition.
| Property | Description |
|---|---|
| kind | Specifies that the resource is a Source |
| name | Provides the unique ID of the Source. This is used to manage the Source and in Continuous Query definitions to configure which Sources the Continuous Query uses as input. |
| spec.kind | Identifies this Source as a PostgreSQL Source that enables connectivity to a PostgreSQL database. |
| spec.properties.host | The DNS host name of the PostgreSQL server. |
| spec.properties.user | The User ID that the Source will use to connect to the PostgreSQL database. |
| spec.properties.port | The port number on which the PostgreSQL server is listening for connections. The default port for PostgreSQL is 5432. |
| spec.properties.ssl | Whether SSL is enabled on the database. Note: If you deployed your PostgreSQL database in your Kubernetes cluster, make sure to set the ssl configuration option to false. |
| spec.properties.password | The Password for the User ID that the Source will use to connect to the PostgreSQL database. Note: It is also possible to reference a Kubernetes secret for this value, see Sources for more details. |
| spec.properties.database | The name of the Database this Source will observe changes from. |
| spec.properties.tables | The list of database table names that the Source will observe for changes. |
Use the drasi CLI to create the Source by running the following command in a terminal window:
drasi apply -f ./resources/hello-world-source.yaml
It may take a minute or two for the new Source to startup and become available. You can inspect the status of all deployed sources by running the command:
drasi list source
You should expect to see a response like this until the Source is ready (AVAILABLE = true):
      ID      | AVAILABLE |            MESSAGES
--------------+-----------+---------------------------------
  hello-world |  false    | query-api - daprd: waiting:
              |           | ContainerCreating  query-api:
              |           | waiting: ContainerCreating
              |           |  reactivator - daprd:
              |           | waiting: ContainerCreating
              |           |  reactivator: waiting:
              |           | ContainerCreating
              |           | change-dispatcher -
              |           | change-dispatcher: waiting:
              |           | ContainerCreating  daprd:
              |           | waiting: ContainerCreating
              |           |  change-router -
              |           | change-router: waiting:
              |           | ContainerCreating  daprd:
              |           | waiting: ContainerCreating
              |           |  proxy - daprd: waiting:
              |           | ContainerCreating  proxy:
              |           | waiting: ContainerCreating
If your Source is not yet available (AVAILABLE = false), you can use the drasi wait command to wait for it to complete its startup:
drasi wait source hello-world -t 120
When drasi wait returns, your Drasi Source for PostgreSQL is created and ready to use.
Step 3 - Create the Continuous Queries
The following YAML is the content of the hello-world-queries.yaml file, which you will use to create the Continuous Queries you need.
apiVersion: v1
kind: ContinuousQuery
name: hello-world-from
spec:
  mode: query
  sources:
    subscriptions:
      - id: hello-world
  query: >
    MATCH
      (m:Message {Message: 'Hello World'})
    RETURN
      m.MessageId AS MessageId,
      m.From AS MessageFrom
---
apiVersion: v1
kind: ContinuousQuery
name: message-count
spec:
  mode: query
  queryLanguage: GQL
  sources:
    subscriptions:
      - id: hello-world
  query: >
    MATCH
      (m:Message)
    LET Message = m.Message
    RETURN
      Message,
      count(Message) AS Frequency
---
apiVersion: v1
kind: ContinuousQuery
name: inactive-people
spec:
  mode: query
  sources:
    subscriptions:
      - id: hello-world
  query: >
      MATCH
        (m:Message)
      WITH
        m.From AS MessageFrom,
        max(drasi.changeDateTime(m)) AS LastMessageTimestamp
      WHERE
        LastMessageTimestamp <= datetime.realtime() - duration({ seconds: 20 })
      OR
        drasi.trueLater(LastMessageTimestamp <= datetime.realtime() - duration({ seconds: 20 }), LastMessageTimestamp + duration({ seconds: 20 }))
      RETURN
        MessageFrom,
        LastMessageTimestamp
Notice that the YAML describes three Continuous Queries. The message-count query uses GQL (Graph Query Language) as indicated by the queryLanguage: GQL property, while the other queries use the default Cypher query language. You can define any number of Drasi Sources, Continuous Queries, and Reactions in a single YAML file as long as you separate each definition with a line containing ---.
This table describes the most important configuration settings in these Continuous Query definitions.
| Property | Description |
|---|---|
| kind | Specifies that the resource is a Continuous Query |
| name | Provides the ID of the Continuous Query. This is used to manage the Continuous Query and in the Reaction configuration below to tell the Reaction which Continuous Queries to subscribe to. |
| spec.queryLanguage | Optional property that specifies the query language. Can be either GQL or Cypher (default). |
| spec.source.subscriptions.id | Identifies the ID of the Source the Continuous Query will subscribe to as a source of change data. In this instance, the id “hello-world” refers to the PostgreSQL Source you created in the previous step. |
| spec.query | Contains the query that defines the behavior of the Continuous Query i.e. what data it is observing to detect change and the content of its result set. |
The following table describes the query used by each of the Continuous Queries you are about to create:
| Query | Description |
|---|---|
| hello-world-from | Matches all nodes with a label (type) Message and filters for only those that have a Message field containing the value “Hello World”. For records that match that pattern, it includes their MessageId and From fields in the query result. |
| message-count | Matches all nodes with a label (type) Message, groups them by the value of their Message field and uses the count aggregation function to calculate the number of times the same value occurred. For each unique message value, the query result will contain the Message value and its Frequency. |
| inactive-people | Matches all nodes with a label (type) Message and uses the time when the Message was added to the database to represent that LastMessageTimestamp for the person that sent the message. The query uses the drasi.trueLater function to only include people that haven’t sent messages in the last 20 seconds to be included in the query result. |
Use the drasi CLI to create the Continuous Queries by running the following command in a terminal window:
drasi apply -f ./resources/hello-world-queries.yaml
To verify the status of the Continuous Queries, execute the following command:
drasi list query
You should expect to see the following output:
         ID        | CONTAINER | ERRORMESSAGE |          HOSTNAME          |  STATUS
-------------------+-----------+--------------+----------------------------+-----------
  hello-world-from |  default  |              | default-query-host-xxx-xxx |  Running
  message-count    |  default  |              | default-query-host-xxx-xxx |  Running
  inactive-people  |  default  |              | default-query-host-xxx-xxx |  Running
Step 4 - Create the Debug Reaction
In order to view the results of the Continuous Queries you will deploy an instance of the Debug Reaction. The Debug Reaction provides a simple Web-based UI that lets you see the current result of a Continuous Query as a table, and to view the query results updating dynamically as the source data changes.
The following YAML is the content of the hello-world-reaction.yaml file, which you will use to create the Debug Reaction.
apiVersion: v1
kind: Reaction
name: hello-world-debug
spec:
  kind: Debug
  queries:
    hello-world-from:
    message-count:
    inactive-people:
This table describes the most important configuration settings in this Reaction definition:
| Property | Description |
|---|---|
| kind | Specifies that the resource is a Reaction |
| name | Provides the ID of the Reaction. This is used to manage the Reaction. |
| spec.kind | Identifies the type of Reaction. The Debug reaction was pre-registered when you executed the drasi init command earlier |
| spec.queries | Specifies the IDs of the Continuous Queries the Reaction will subscribe to. In this case you specify the IDs of the three Continuous Queries you created in the previous step. |
Use the drasi CLI to create the Debug Reaction by running the following command in a terminal window:
drasi apply -f ./resources/hello-world-reaction.yaml
To verify the status of the Reaction, execute the following command:
drasi list reaction
You should expect to see the following response:
         ID         | AVAILABLE |                   INGRESS URL                      | MESSAGES
--------------------+-----------+----------------------------------------------------+-----------
  hello-world-debug | true      | http://hello-world-debug.drasi.<ip-address>.nip.io |
If your Reaction is not yet available (AVAILABLE = false), you can use the drasi wait command to wait for it to complete its startup:
drasi wait reaction hello-world-debug -t 120
When drasi wait returns, your Debug Reaction is created and ready to use.
Once the Debug Reaction is working (AVAILABLE = true), the Drasi Hello World solution is fully deployed and ready to test.
Access the Debug Reaction Web UI as follows:
By default, the Debug Reaction is configured with ingress. The GitHub Codespace setup script has already port-forwarded the traefik ingress controller to port 8080. We now need to update the port visibility settings to make port 8080 public:
- Go to the PORTS tab in VS Code and Right click on port 8080
- Select Port Visibility
- Mark it as public
- Make sure that the port is marked as Public.
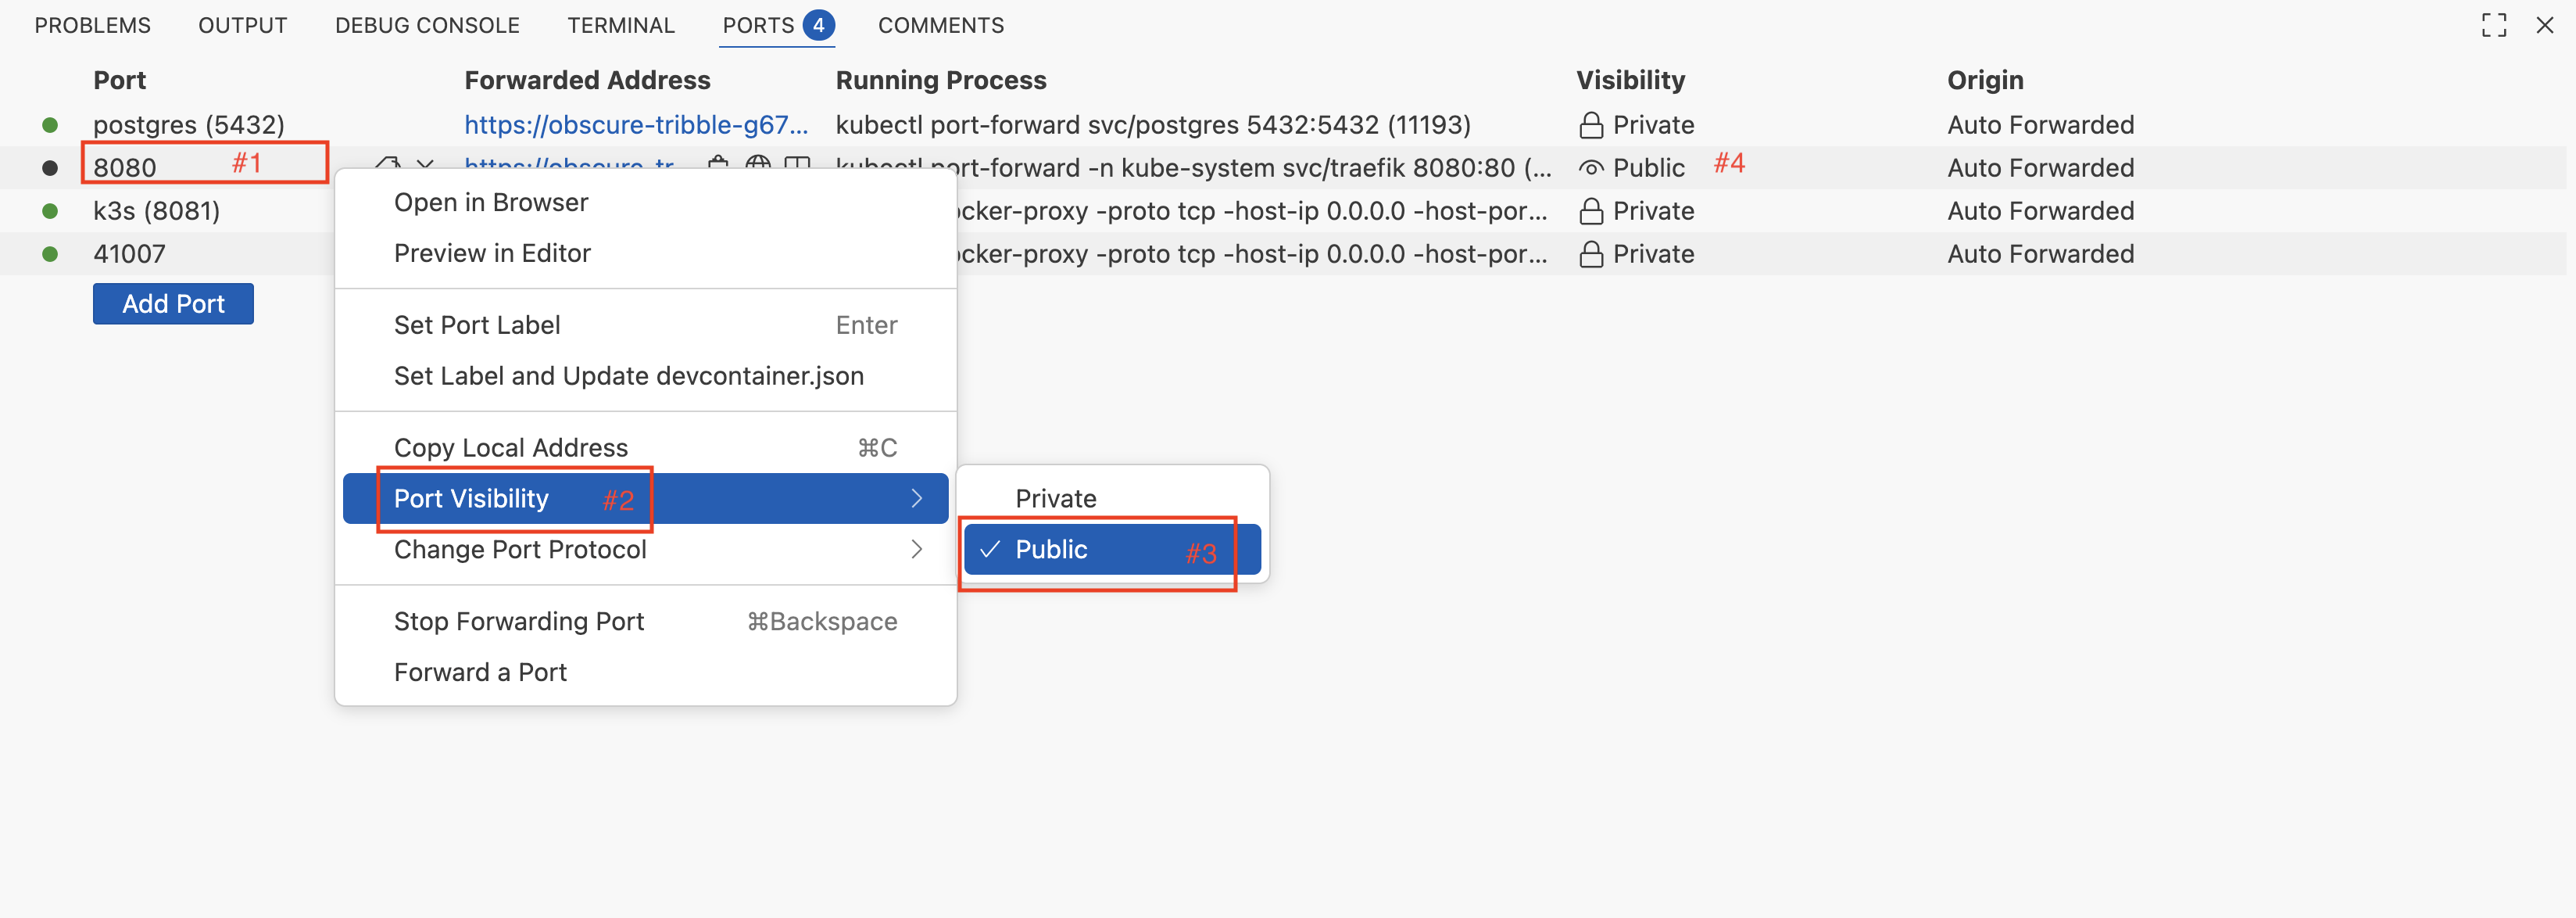
The demo should now be accessible at https://<your-codespace-id>-8080.app.github.dev/. You can access the UI by clicking on the browser link shown in the PORTS tab for port 8080.
By default, the Debug Reaction is configured with ingress and can be accessed directly using the URL from the drasi list reaction command output by appending :8080 to the hostname. For example, if the ingress URL is http://hello-world-debug.drasi.127.0.0.1.nip.io, you would access the Debug Reaction at:
http://hello-world-debug.drasi.127.0.0.1.nip.io:8080
- AKS/EKS: You can access the Debug Reaction using the ingress URL from the
drasi list reactioncommand output. - Kind/k3d: Please refer to the ingress setup instructions for your local cluster to access the Debug Reaction using the ingress.
In addition to accessing the Debug Reaction via ingress, you can also port-forward the Debug Reaction service to your local machine. Run the following command in a terminal window:
drasi tunnel reaction hello-world-debug 8080
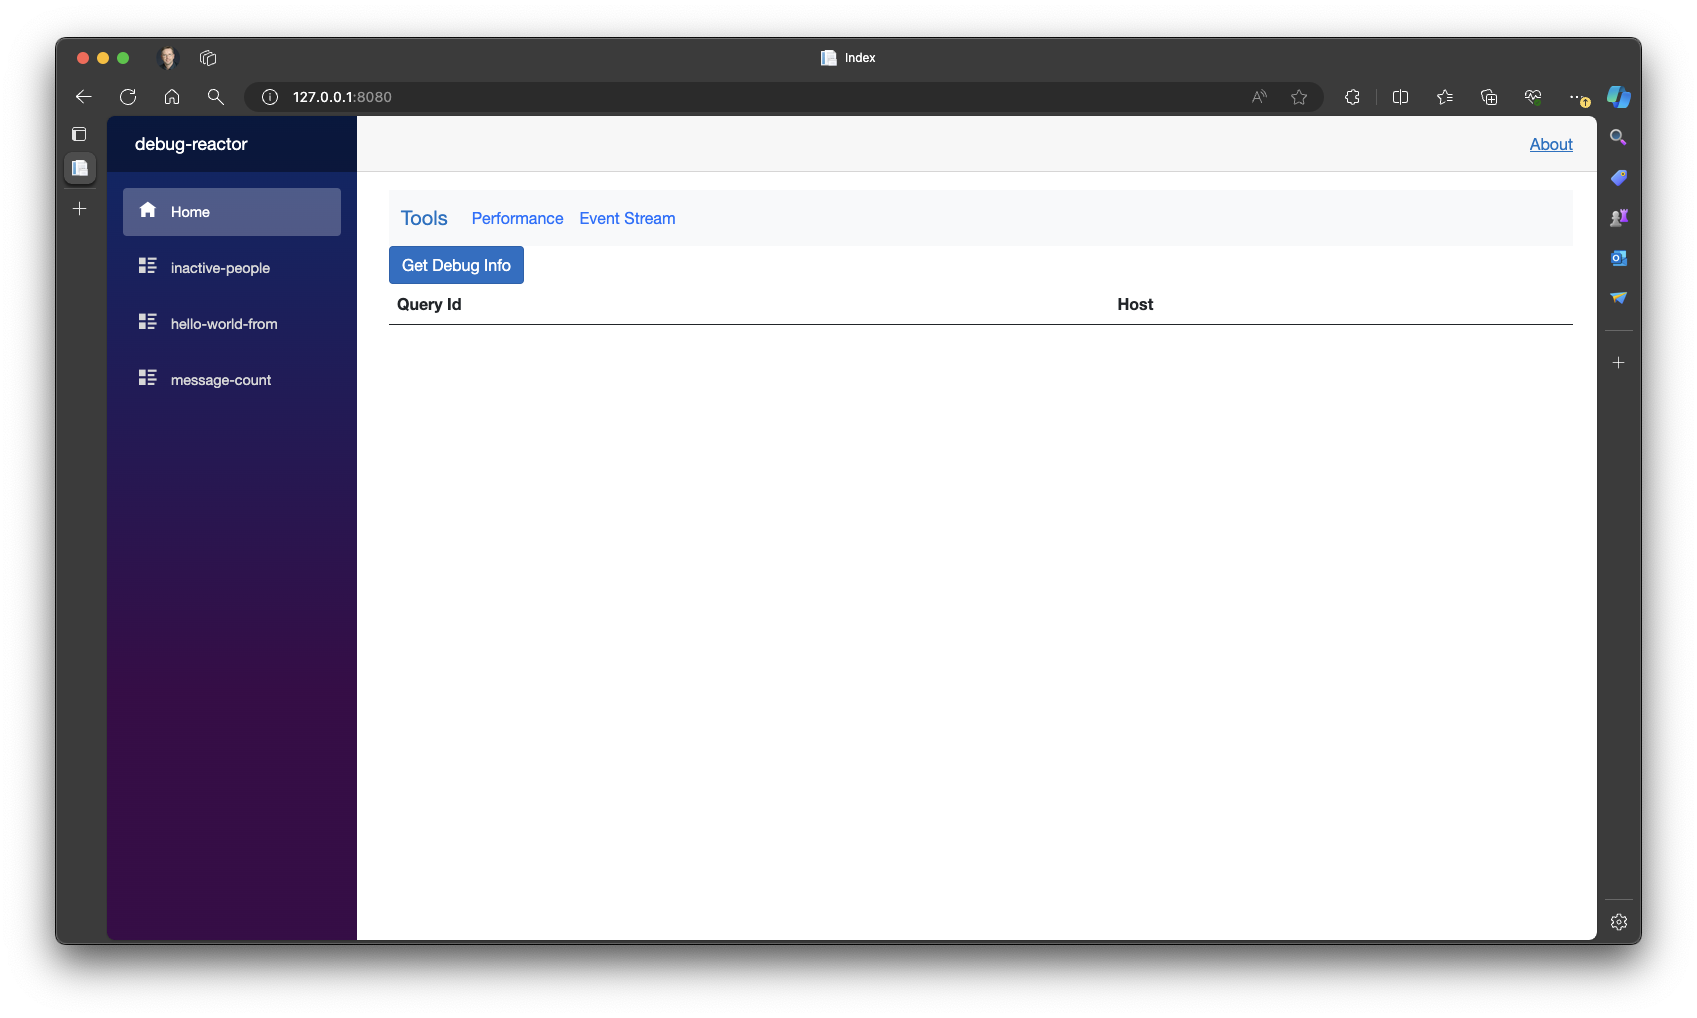
Now open your browser and navigate to http://localhost:8080, where you will see the Debug Reaction UI shown here:
Step 5 - Test the Solution
To test the Hello World solution, you will need to add/update/delete data in the Message table of the PostgreSQL database, so you will need a way to run SQL commands.
The GitHub Codespace is pre-configured with psql, the PostgreSQL CLI, which will connect to the pre-installed PostgreSQL database. If you run the following command from a Dev Container terminal, it will create an interactive terminal session with the database in which you can enter SQL commands and see the results:
psql
The Dev Container is pre-configured with psql, the PostgreSQL CLI, which will connect to the pre-installed PostgreSQL database. If you run the following command from a Dev Container terminal, it will create an interactive terminal session with the database in which you can enter SQL commands and see the results:
psql
You can connect to the PostgreSQL database using tools like psql.
If you prefer to use a GUI interface, you can install pgAdmin on your local machine and use the following connections settings:
| Setting | Value |
|---|---|
| Host Name | localhost |
| Database Name | hello-world |
| Port | 5432 |
| User Id | test |
| Password | test |
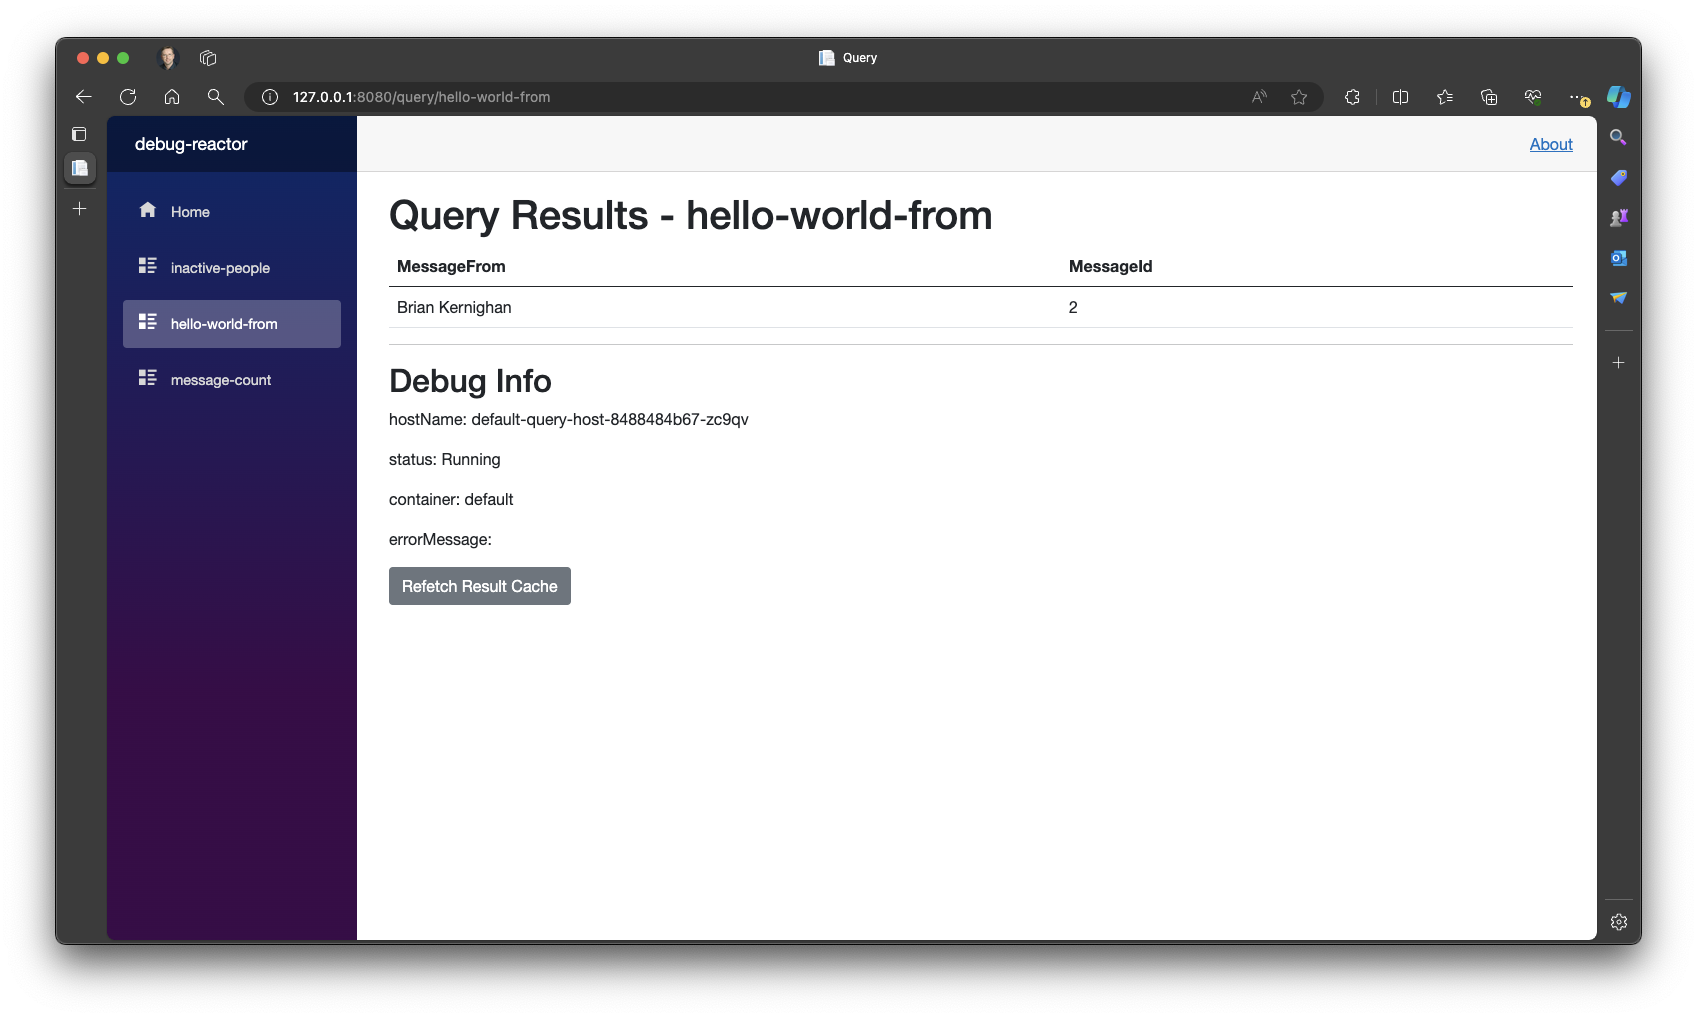
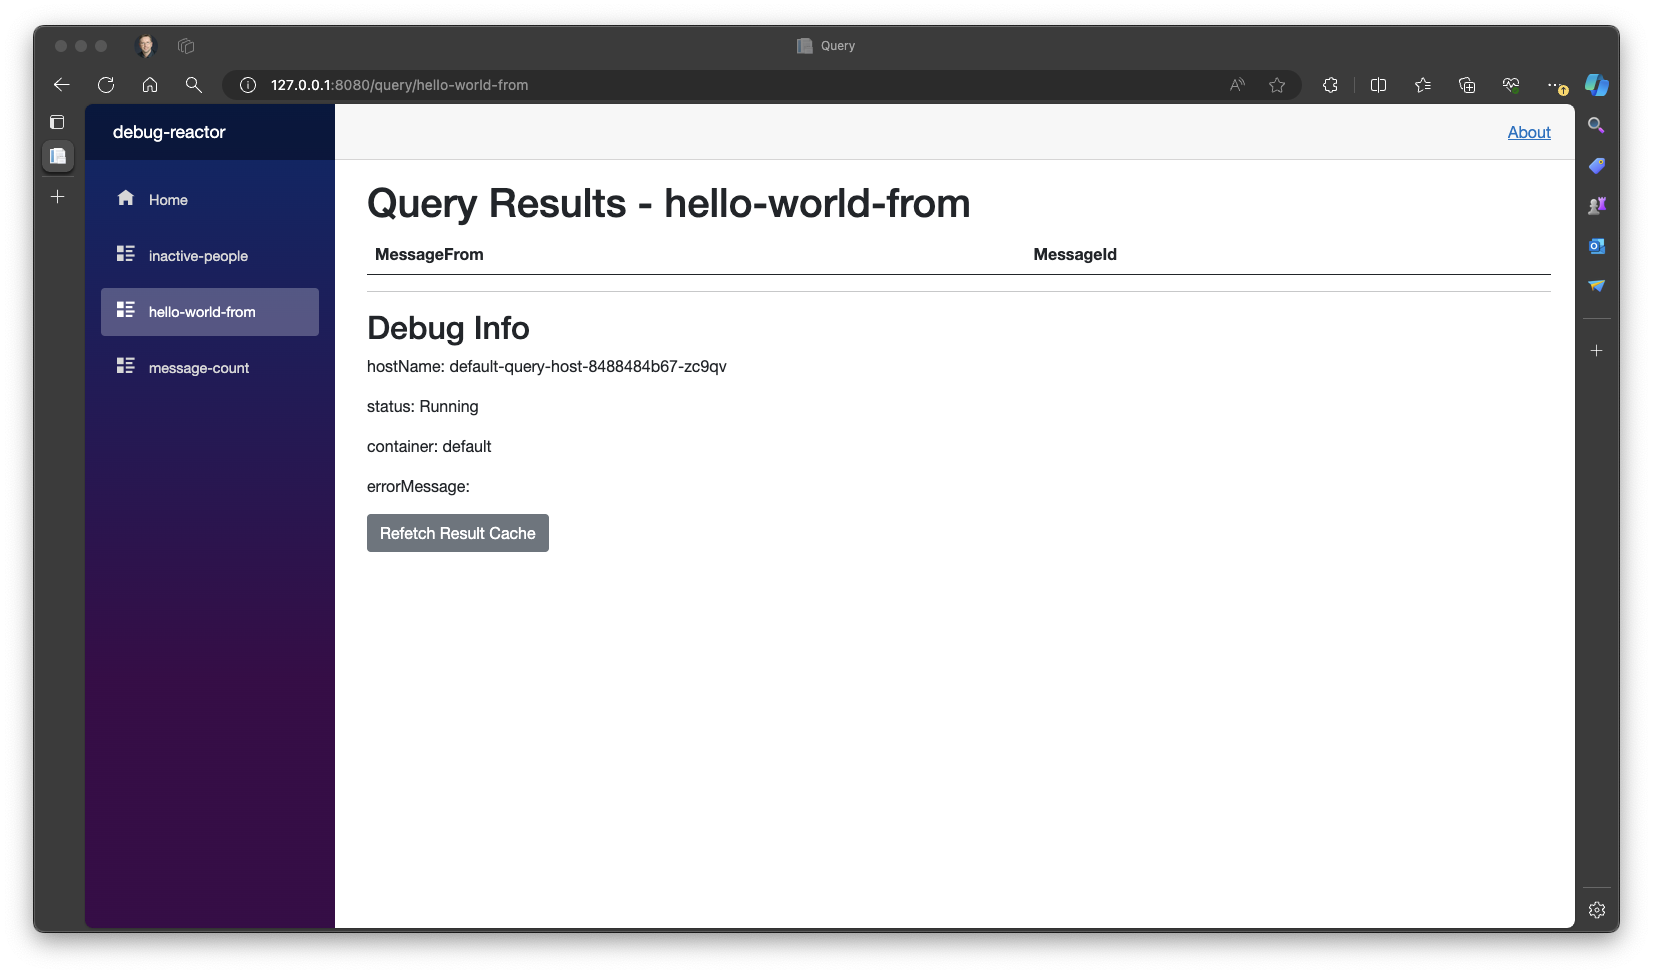
On the left hand side is a menu listing the three Continuous Queries created earlier. Select hello-world-from entry and the right hand pane will show the current results of the hello-world-from query. Initially, there is only one result, because only Brian Kernighan is associated with the “Hello World” message.
If you add another Message to the table using the following SQL insert statement:
INSERT INTO public."Message" VALUES (5, 'Allen', 'Hello World');
You will see a second record for Allen appear dynamically in the query result:

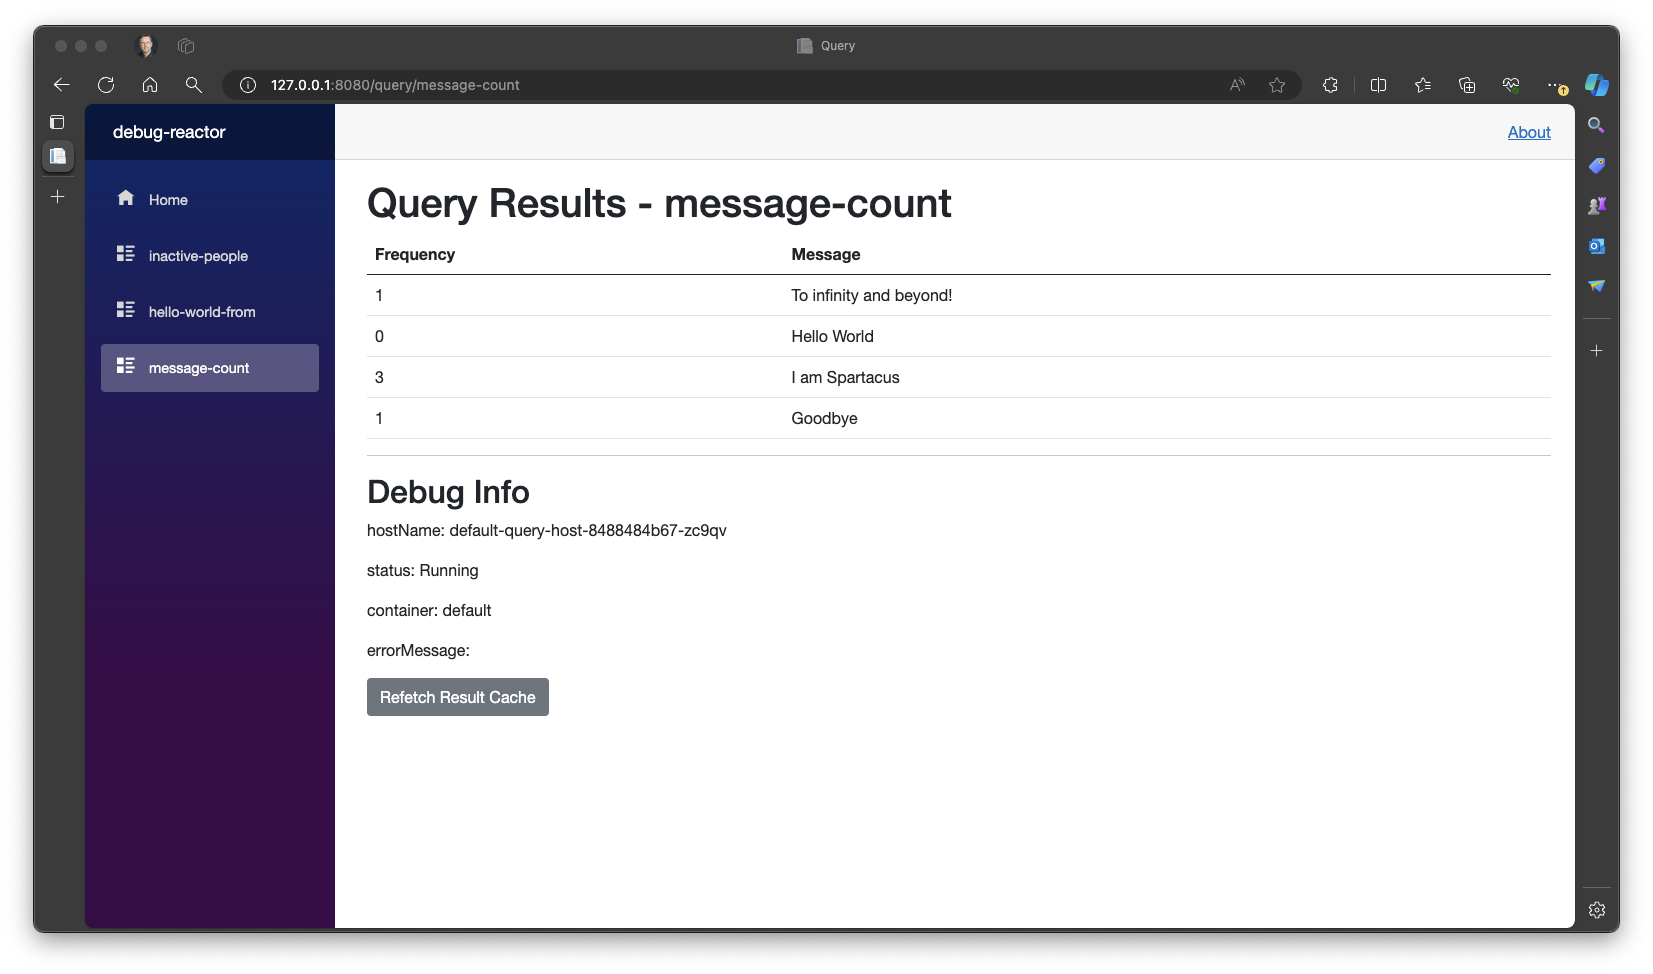
In the list of Continuous Queries select the message-count entry and the right hand pane will show the current results to the message-count query. There are three results, as shown below. Note that because of the “Hello World” message you just added for Allen, both “Hello World” and “I am Spartacus” have a Frequency of 2.
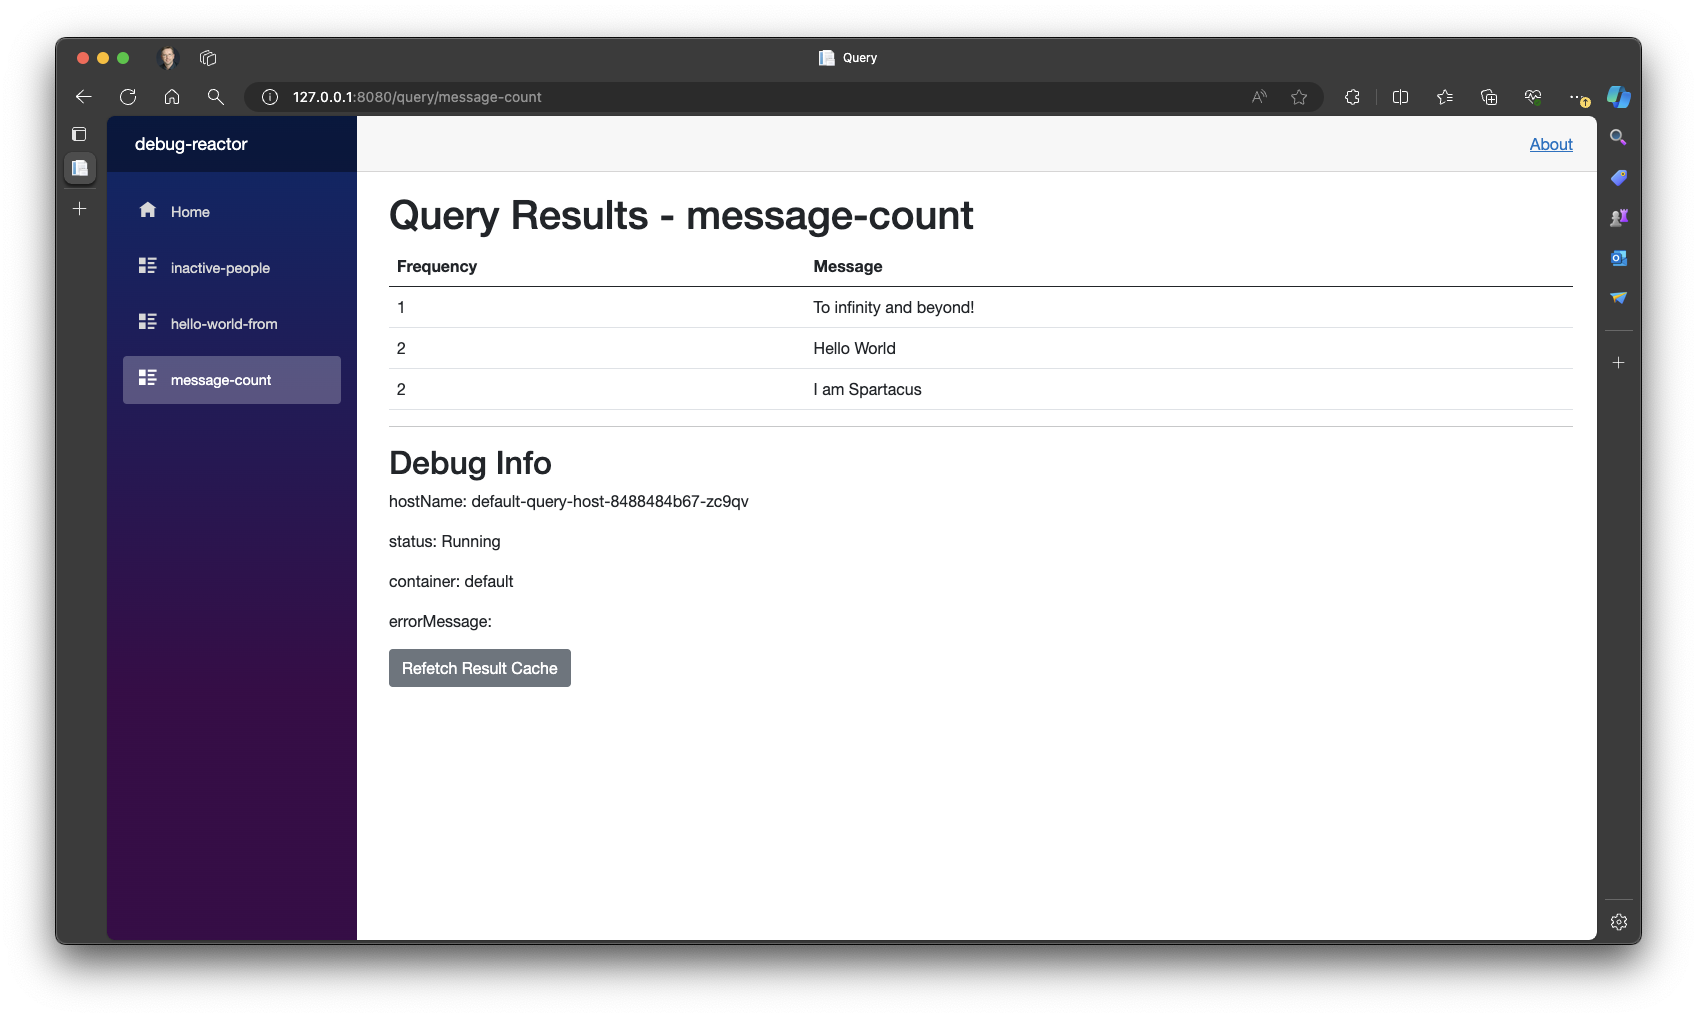
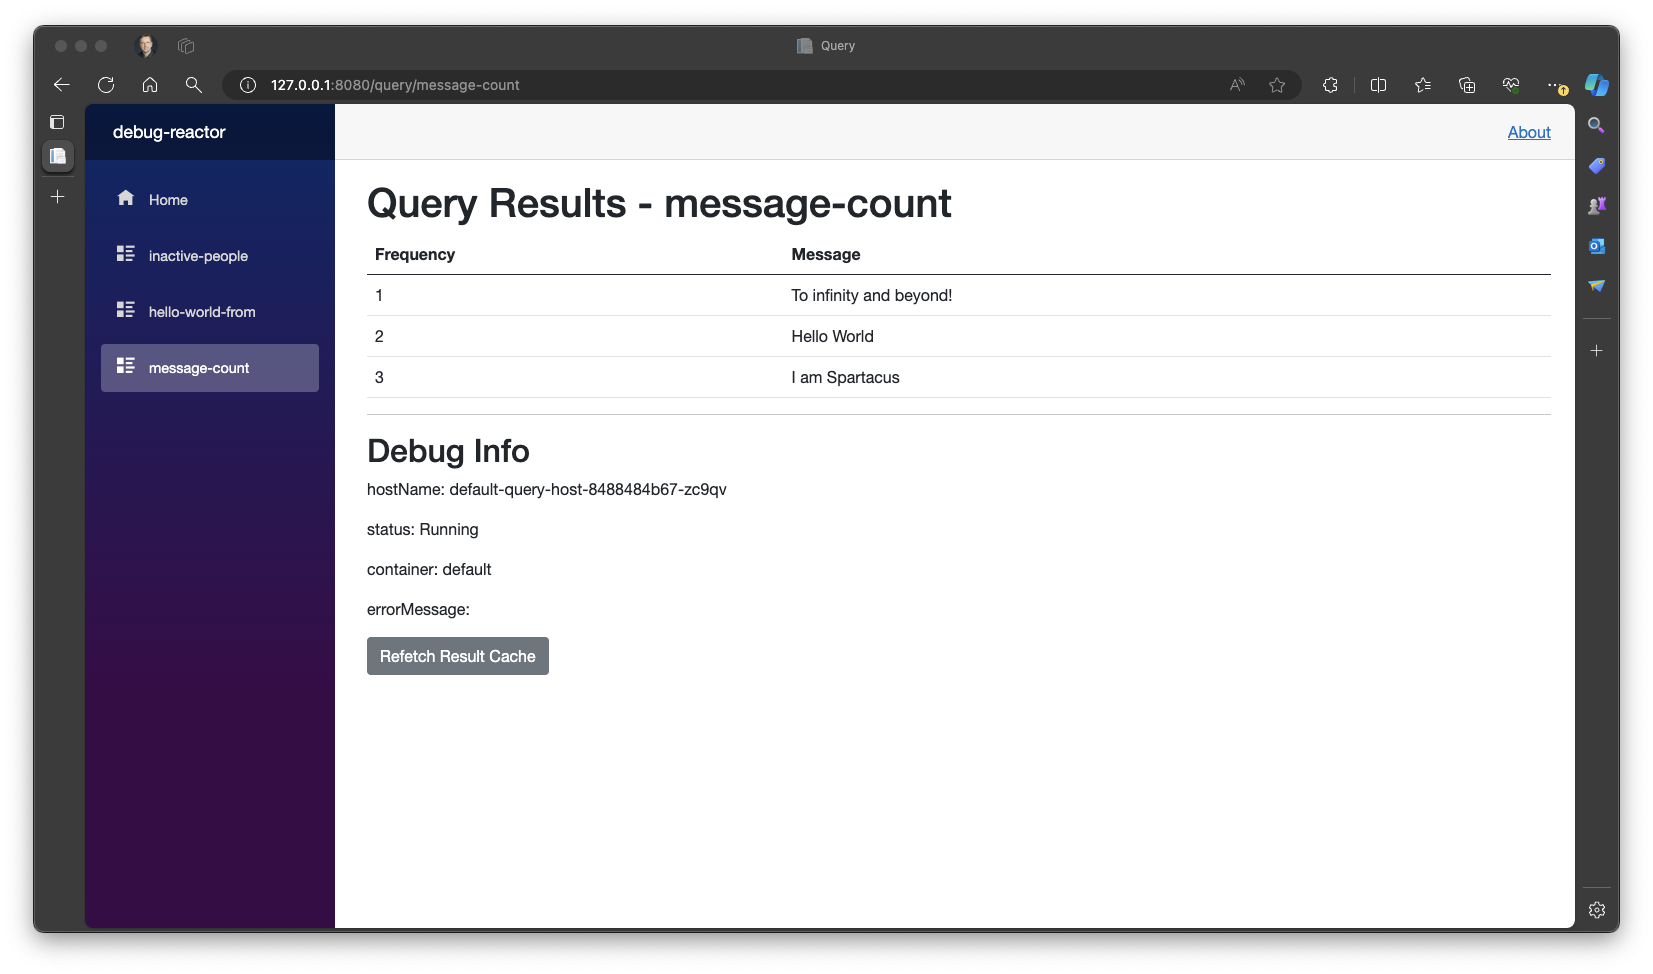
If you add another Message to the table using the following SQL insert statement:
INSERT INTO public."Message" VALUES (6, 'Allen', 'I am Spartacus');
You will see the “I am Spartacus” Frequency increase dynamically to 3:
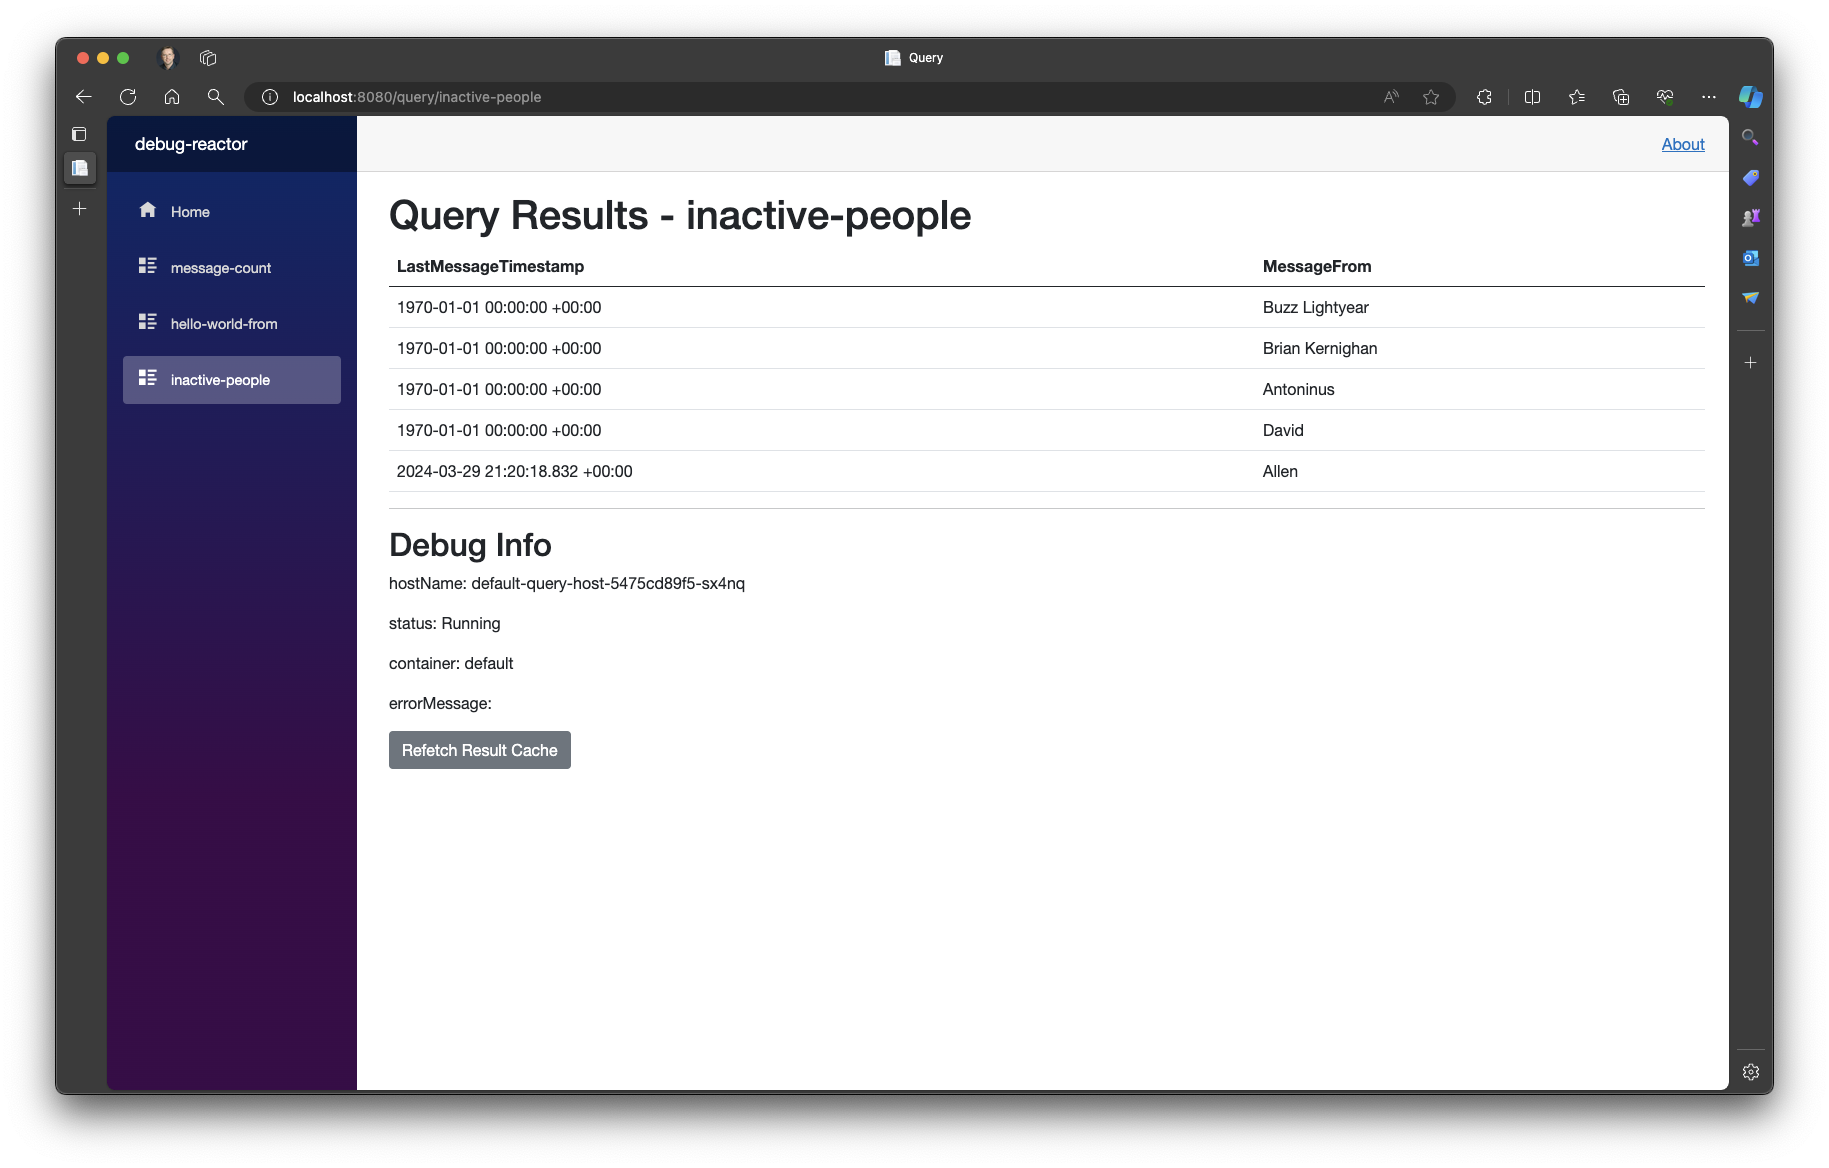
In the list of Continuous Queries select the inactive-people entry and the right hand pane will show the current results to the inactive-people query. Assuming you issued the last database change more than 20 seconds ago, you will see Allen on the list of inactive people.
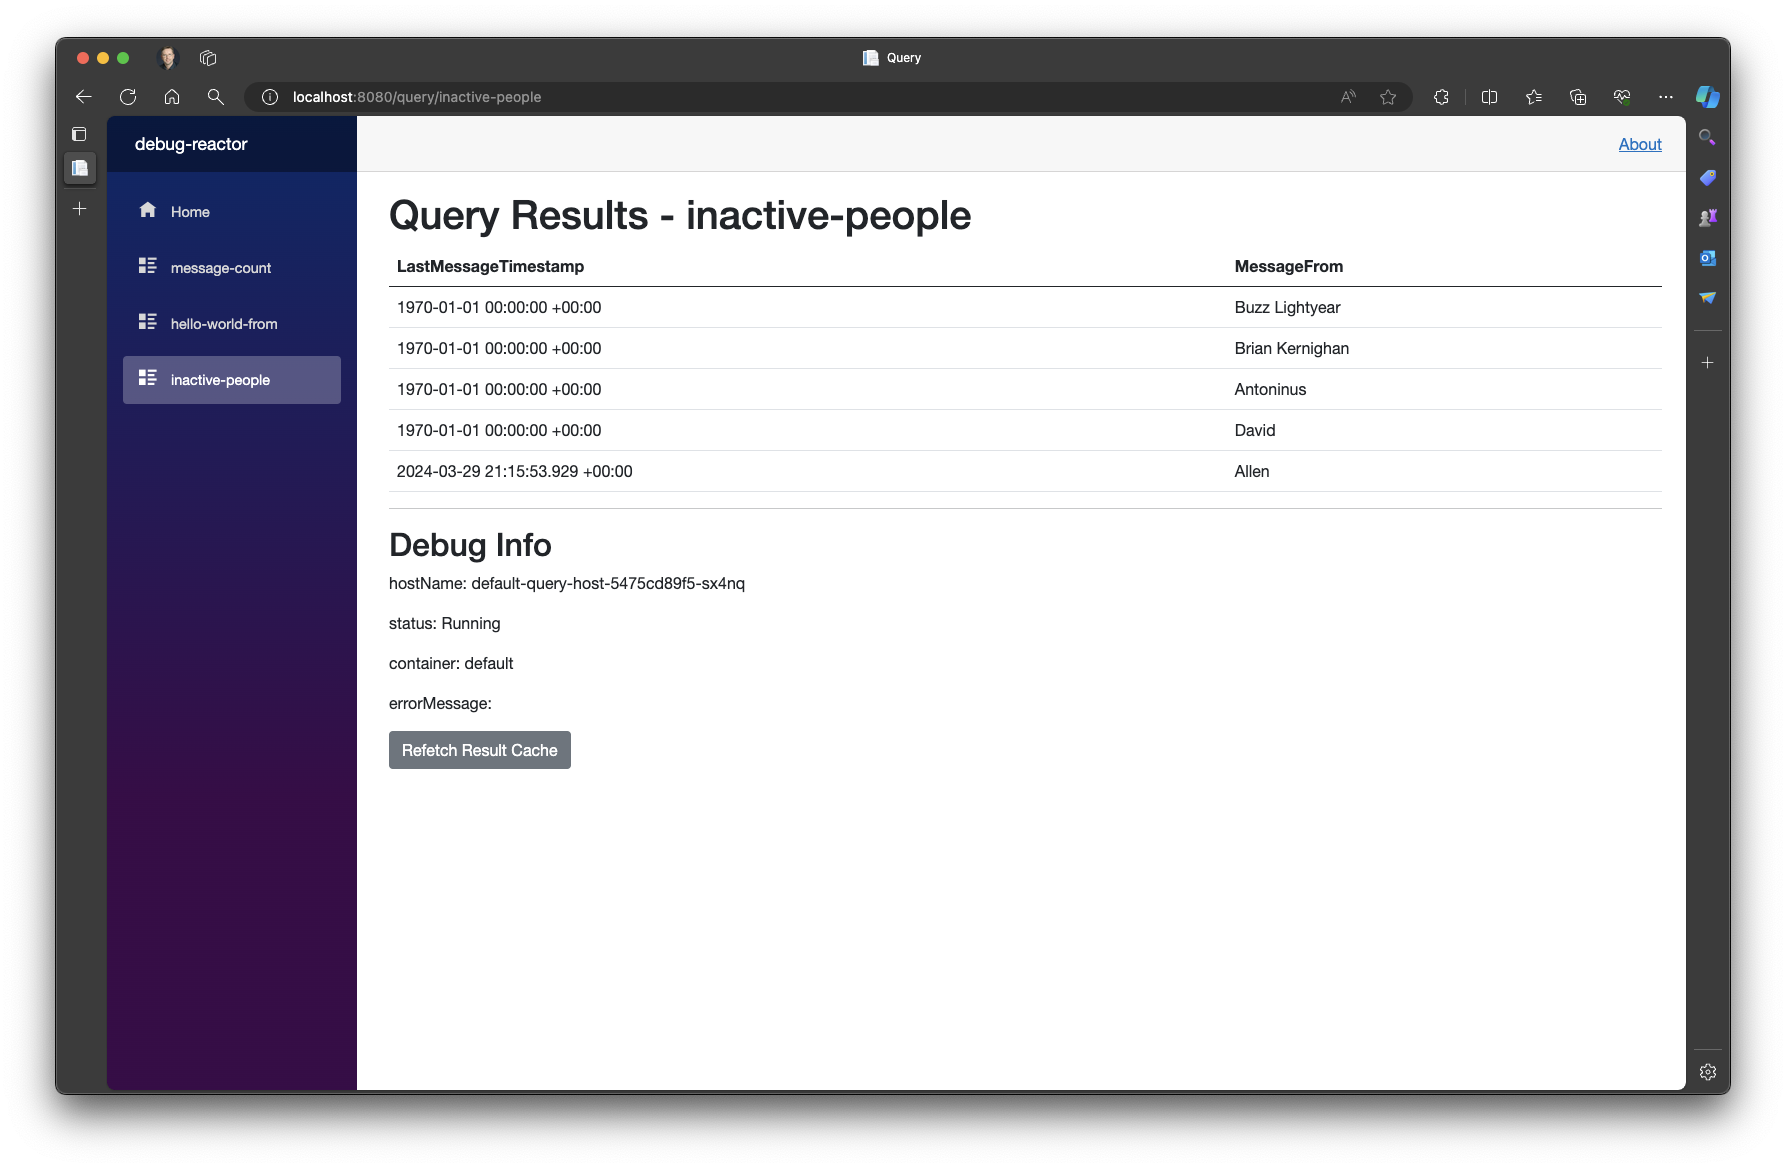
If you add another Message from Allen to the table using the following SQL insert statement:
INSERT INTO public."Message" VALUES (7, 'Allen', 'Goodbye');
Allen will disappear from the list of inactive people, because he just sent a message:
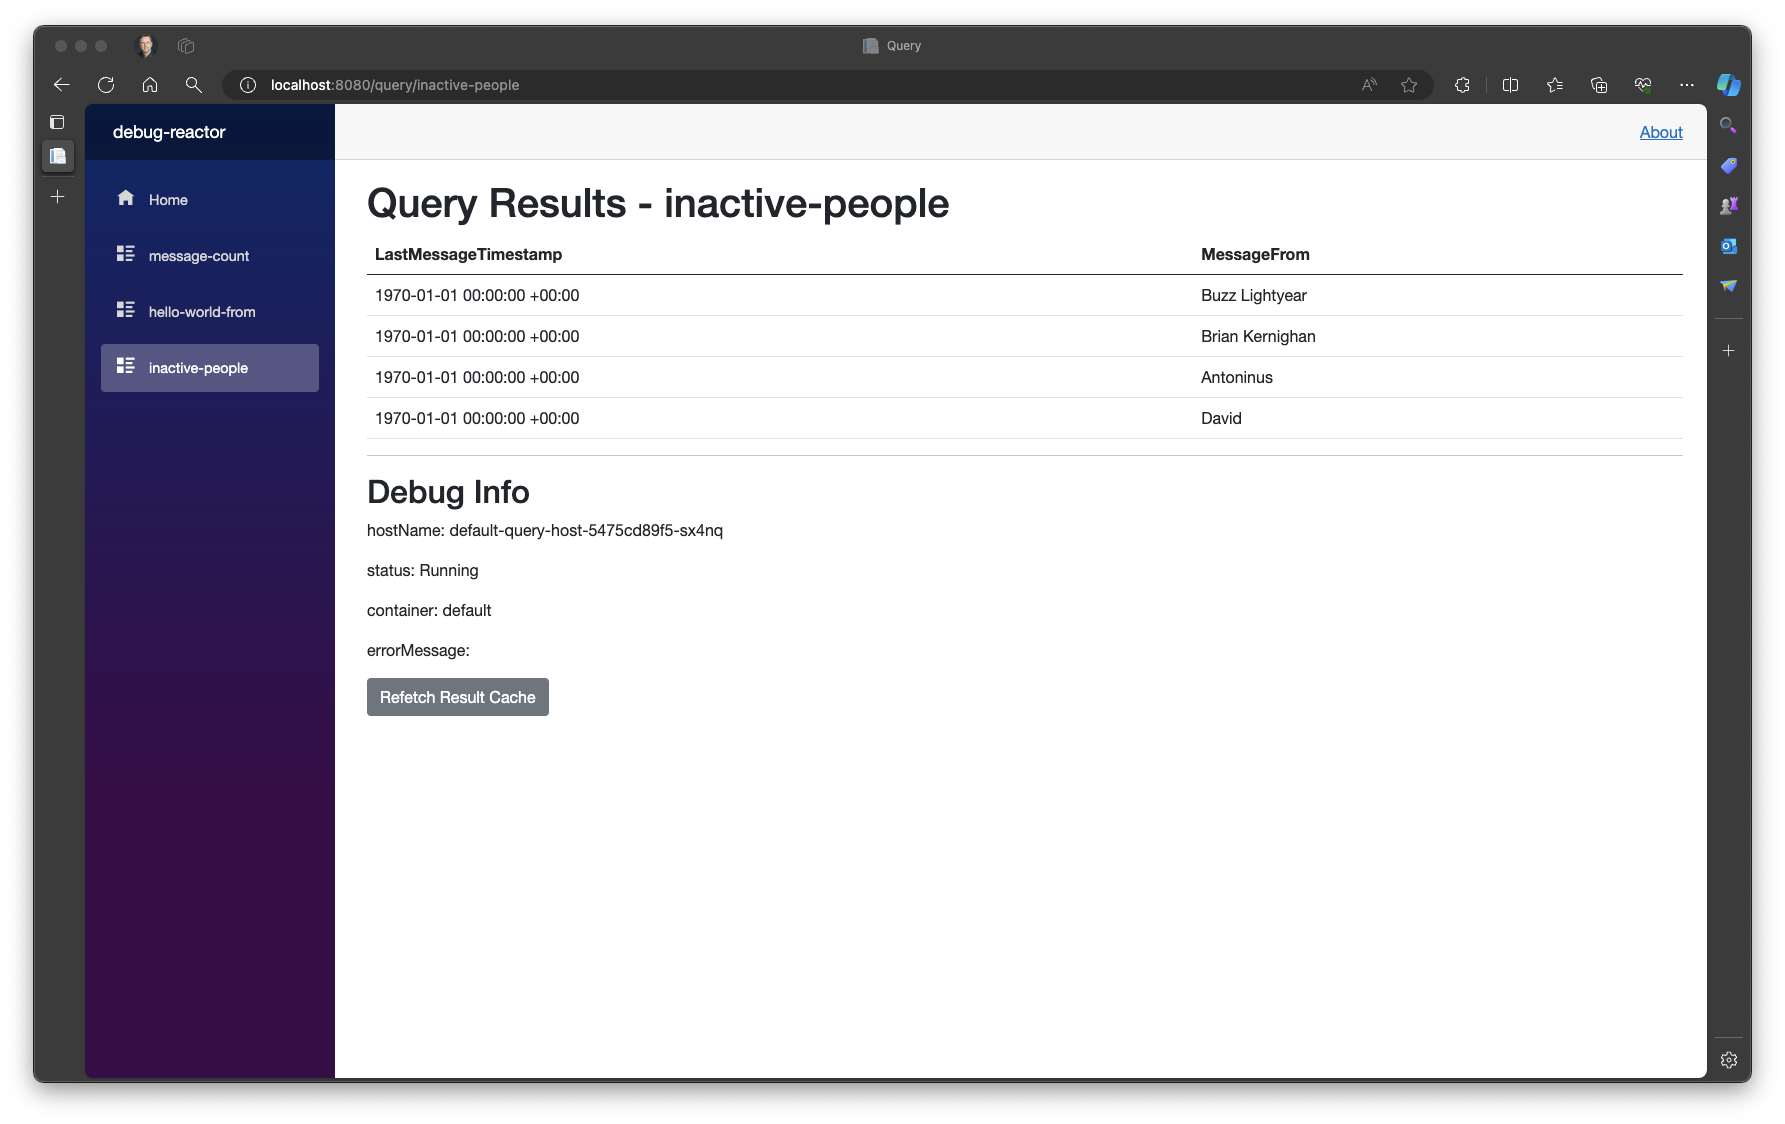
But, if you wait 20 seconds, Allen will reappear on the list of inactive people, because he has not sent a message in the allowed 20 second time interval:
Finally, if you return to the message-count Continuous Query and delete both “Hello World” messages using the following SQL statement:
DELETE FROM public."Message" WHERE "Message" = 'Hello World';
The Debug Reaction updates the UI to show a zero count for messages with the text “Hello World”:
And if you switch back to the hello-world-from Continuous Query, the current result is empty as expected:
This tutorial is now complete. The Dev Container is running a fully functional version of Drasi that you can use for further exploration, development, and testing.
Reflection
In completing the Getting Started Tutorial, you were able to answer questions like “Which people have sent the message Hello World”, “How many times has each unique message been sent”, and “Which people haven’t sent messages in the last 20 seconds” using Continuous Queries. Using the Continuous Queries RESULT clause, you were able to describe those changes to best meet your needs. And then you could distribute those changes to Reactions for further processing or integration into a broader solution. You did this with no custom code and a minimal amount of configuration information.
Although the data and queries in the tutorial where trivial, the process is exactly the same for richer and more complex scenarios, only the Continuous Query increases in complexity and this depends totally on what question you are trying to answer.
Without Drasi, to achieve what you just did in the tutorial, you would need to write code to process change logs or periodically poll the database for changes. You would need to maintain your own state to track which data had changed and to calculate the aggregates across the changing data. And you would need to implement a timer and callback mechanism to create notifications when changes had not happened as expected. You would need to implement unique solutions for each type of source you wanted to support.
Hopefully, from this simple tutorial you can see the efficiencies and time saving Drasi offers, and the opportunities it presents for improving and simplifying the ability to detect and react to change in dynamic system as well as its ability to power solutions that are more dynamic and responsive.
Next Steps
Connecting a Frontend to a Query
Now that you have completed the Getting Started Tutorial, you can continue your journey by connecting a front end application to a Continuous Query.
The Connecting a Frontend to a Query tutorial picks up from the end of this tutorial and shows you how to connect a ReactJS or VueJS application to the Continuous Queries you created in this tutorial.
Cleanup
Cleanup steps depend on how you ran the Getting Started Tutorial:
If you no longer need the Codespace and want to cleanup, you can go to Your codespaces page on GitHub and delete the codespace.
If you no longer need the Dev Container and want to cleanup, you can:
- Click the
Dev Container connection statusbox in the bottom left corner of VS Code - Select
Close Remote Connectionfrom the list of options that appear - Run the VS Code command `Dev Containers: Clean Up Dev Containers…"
- Select the
getting-startedimage and clickokto remove the unused image - Select the unused volumes and click
okto remove the unused volumes
Use the drasi delete to delete the Debug Reaction, Continuous Queries, and PostgreSQL Source with the following commands:
Delete the Debug Reaction:
drasi delete -f ./resources/hello-world-reaction.yaml
Delete the Continuous Queries:
drasi delete -f ./resources/hello-world-queries.yaml
Delete the PostgreSQL Source:
drasi delete -f ./resources/hello-world-source.yaml
Run drasi uninstall to delete the Drasi environment:
drasi uninstall -y
Feedback
Was this page helpful?
Glad to hear it! Please tell us what you found helpful.
Sorry to hear that. Please tell us how we can improve.